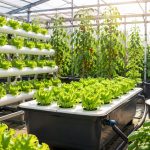
Hydroponics used to be something you’d only see in commercial greenhouses or the occasional university research lab. Now people are growing basil in their HDB kitchens, lettuce in Melbourne apartments, and full herb walls in spare bedrooms across Southeast Asia and Australia. The shift has been real, and the reasons aren’t hard to understand, no garden required, water usage a fraction of soil gardening, and year-round growing regardless of what’s happening outside.
But here’s where most beginners go wrong before they’ve even bought anything: they watch a few hours of YouTube, get excited about the most impressive-looking system they can find, order it online, and spend the next six weeks troubleshooting a setup that was too complicated for someone who’s never grown a single plant hydroponically.
The system you start with genuinely matters. Not because you can’t learn on a hard system, you can but because a system that’s too complex for your current skill level turns what should be an enjoyable hobby into a frustrating, expensive mess. And the number of people who quit hydroponics after their first failed system is honestly a shame, because most of them picked the wrong starting point, not the wrong hobby.
This guide is specifically about that decision. Not a surface-level overview that lists five systems and says they’re all great, a real comparison that tells you which systems are actually beginner-friendly, which ones to avoid until you know what you’re doing, and which setup makes the most sense for your space, budget, and lifestyle. There’s also specific advice for apartment growers, and for those of you growing in Singapore or Australia where climate and living conditions add their own variables.
What Is a Hydroponic System, Really?
The short version: Hydroponics means growing plants without soil. Instead of roots drawing nutrients from dirt, you deliver a nutrient-rich water solution directly to the roots. Plants are supported by an inert growing medium, clay pebbles, rockwool, coco coir that holds them in place without feeding them anything itself.
That definition covers every hydroponic system. What separates them is how the nutrient solution reaches the roots and that single difference determines almost everything else about a system’s cost, complexity, and forgiveness when things go sideways.
A Deep Water Culture bucket and a commercial NFT channel are both “hydroponic systems” in the same way a bicycle and a motorcycle are both “vehicles.” Technically accurate. Practically worlds apart.
Some systems flood roots periodically and let them dry slightly between floods. Some run a continuous thin film of solution past exposed roots. Some suspend roots directly in aerated water. And one (Kratky) just leaves roots sitting in a reservoir with no moving parts at all, and somehow works beautifully.
Understanding these differences before you spend any money is the whole point.
What Actually Matters When Choosing a Beginner System
Most guides will tell you to consider “cost, maintenance, and scalability.” True enough, but not very useful on its own. Here’s what those things actually mean in practice.
Cost isn’t just the upfront price. Your first system is essentially a tuition fee you’re paying to learn, not to produce food commercially. Starting cheap means you can afford to make the inevitable beginner mistakes without serious financial regret. It also means that if you discover you prefer a completely different approach after your first crop, you haven’t locked yourself into anything expensive.
Maintenance is where beginners consistently underestimate what they’re signing up for. A system that needs daily pH checks, pump inspections, and nutrient top-ups sounds manageable in theory. After two weeks of real life work, travel, late nights that daily attention becomes a source of anxiety. Be honest with yourself about your schedule before choosing something high-maintenance.
Space is the overlooked one, especially for apartment growers. A system that takes up an entire spare room might be fine if you have one. If you’re working with a kitchen bench or a small balcony, size becomes the most important constraint of all.
Forgiveness and this is the one that matters most for beginners refers to how quickly a system fails when something goes wrong. Some systems give you hours or days to notice and fix a problem. Others give you minutes before roots start dying. Start with the forgiving ones.
Scalability matters less than people think at the start. Worry about it after your first successful harvest.
What a Good Beginner System Looks Like
- Can be set up for under $150 AUD / $150 SGD
- Has minimal moving parts fewer components means fewer failure points
- Doesn’t need daily intervention to stay healthy
- Works indoors under grow lights or decent natural light
- Suitable for herbs and leafy greens (the easiest, most rewarding starter crops)
- Easy to clean thoroughly between growing cycles
- Doesn’t require technical expertise to build or troubleshoot
Quick Comparison: All Major Systems at a Glance
| System | Difficulty | Cost | Maintenance | Best Plants | Best For |
|---|---|---|---|---|---|
| Deep Water Culture (DWC) | Easy | Low–Medium | Low–Medium | Lettuce, herbs, tomatoes | Beginners wanting an active system |
| Kratky Method | Very Easy | Very Low | Very Low | Lettuce, herbs, spinach, bok choy | Absolute beginners, apartments |
| Wick System | Very Easy | Very Low | Low | Small herbs, microgreens | Tiny spaces, experimenting |
| NFT | Moderate | Medium | Medium | Lettuce, strawberries | Intermediate growers scaling up |
| Ebb and Flow | Moderate | Medium–High | Medium | Wide variety incl. fruiting veg | Intermediate, wanting plant variety |
| Vertical Systems | Easy–Moderate | Medium | Low–Medium | Herbs, lettuce, strawberries | Apartment growers with limited floor space |
| Aeroponics | Advanced | High | High | Most plants | Experienced growers only |
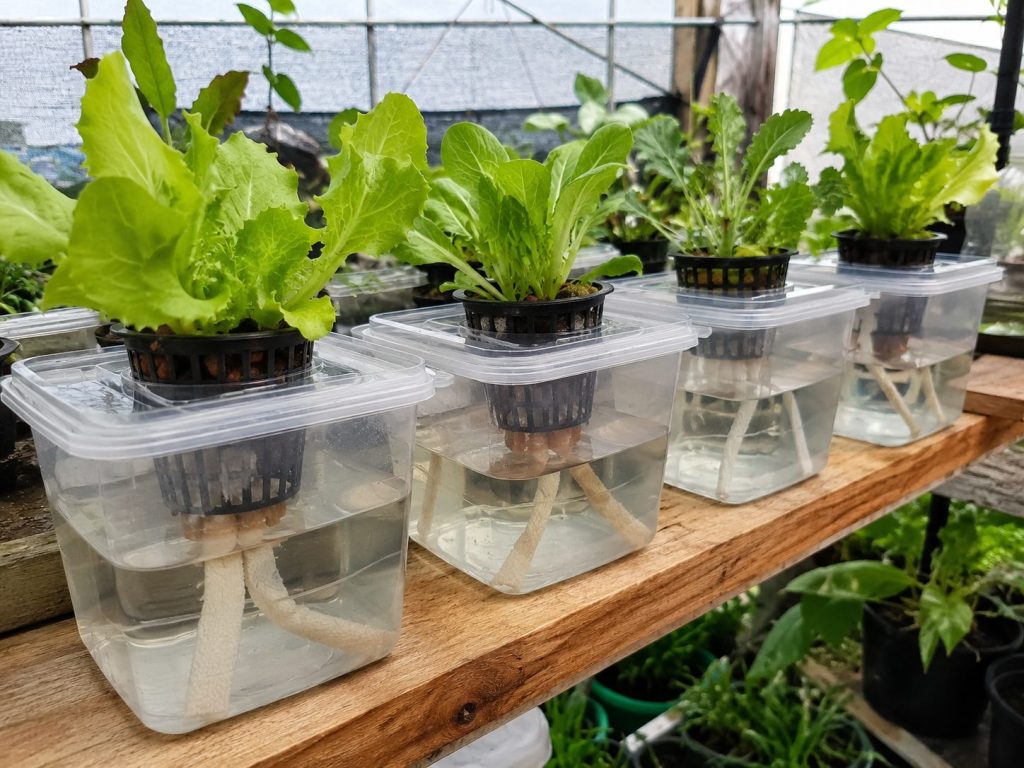
Deep Water Culture (DWC)
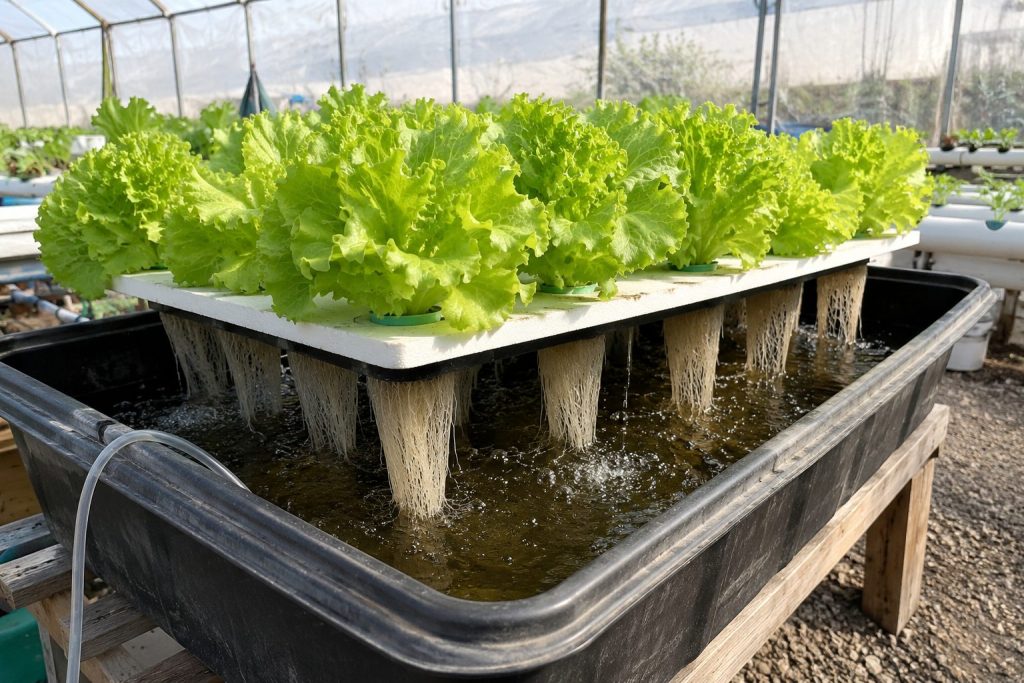
If you’re standing in a garden centre or scrolling through online hydroponic shops trying to pick your first system, DWC is usually the safest bet. Not because it’s the flashiest option, but because it gets the fundamentals right: it’s cheap to start, surprisingly forgiving, produces results quickly enough to keep you motivated, and teaches you the core skills you’ll use in every system you ever run.
The concept is simple enough to explain in one sentence. Plant roots are suspended in a reservoir of nutrient solution, and an air pump continuously bubbles oxygen through the water to keep roots healthy. That’s it. The same air pump you’d buy for a fish tank, a food-safe container with a lid, some net pots, a bag of clay pebbles, and a bottle of nutrients that’s a functional DWC system.
How It Works
- Fill a reservoir (5–20 litres is typical for home use) with water and your chosen nutrient solution
- Adjust pH into the 5.5–6.5 range this is important and we’ll come back to why
- Run airline tubing from an external air pump to air stones sitting at the bottom of the reservoir
- Cut holes in the lid, insert net pots with seedlings and growing medium
- Top up water and nutrients as the plants absorb them, and check pH every few days
You can realistically set this up in an afternoon. A lot of DWC growers are genuinely surprised by how little time daily maintenance takes once the system is running the main jobs are checking the reservoir level and keeping pH in range.
One thing worth knowing before you buy anything: the air pump is critical. Not because it needs to be expensive, but because if it stops working and you don’t notice for a day or two, roots in a low-oxygen reservoir start declining quickly. Some growers run two small air pumps for redundancy. It’s a cheap insurance policy.
The real strengths of DWC
The growth rate is the thing that tends to hook people. Lettuce that might take 60–70 days in a decent garden bed often comes in around 35 days in a well-managed DWC system. Roots have constant access to exactly the right nutrients and oxygen, and plants respond to that. The root mass itself white, healthy-looking, visibly thriving becomes something you end up checking on more than you expected.
Cost-wise, a single-bucket setup for four to six plants can be built for $25–$50. If you buy a commercial DWC kit, you’ll spend more, but you don’t need to. A food-safe tote container from a hardware store and a basic aquarium pump kit is plenty to start.
Where DWC can bite you
Water temperature is the main one, especially in warm climates. Nutrient solution above about 24°C holds less dissolved oxygen, which means roots can struggle even with the pump running. In Singapore’s ambient temperatures or during an Australian summer, this requires management an insulated reservoir, a climate-controlled room, or in serious cases a small aquarium chiller.
The other potential issue is reservoir changes. Every week or two, you’ll want to do a full water change to prevent nutrient imbalances from building up. This means temporarily removing your plants, dumping the old solution, cleaning the reservoir, and mixing fresh nutrients. It’s not hard, but it’s the most hands-on maintenance DWC regularly asks of you.
For large plants tomatoes, cucumbers, anything that grows vigorously for months DWC works but demands bigger reservoirs and closer attention to nutrient ratios as plants mature. For your first grow, stick to lettuce and herbs.
Who should actually start with DWC?
Anyone who wants a proper active hydroponic system with real learning value, fast results, and a forgiving buffer when things go slightly wrong. It’s the system most experienced hydroponic growers started with, and there’s a reason for that. If you can only pick one system to begin with, this is the one.
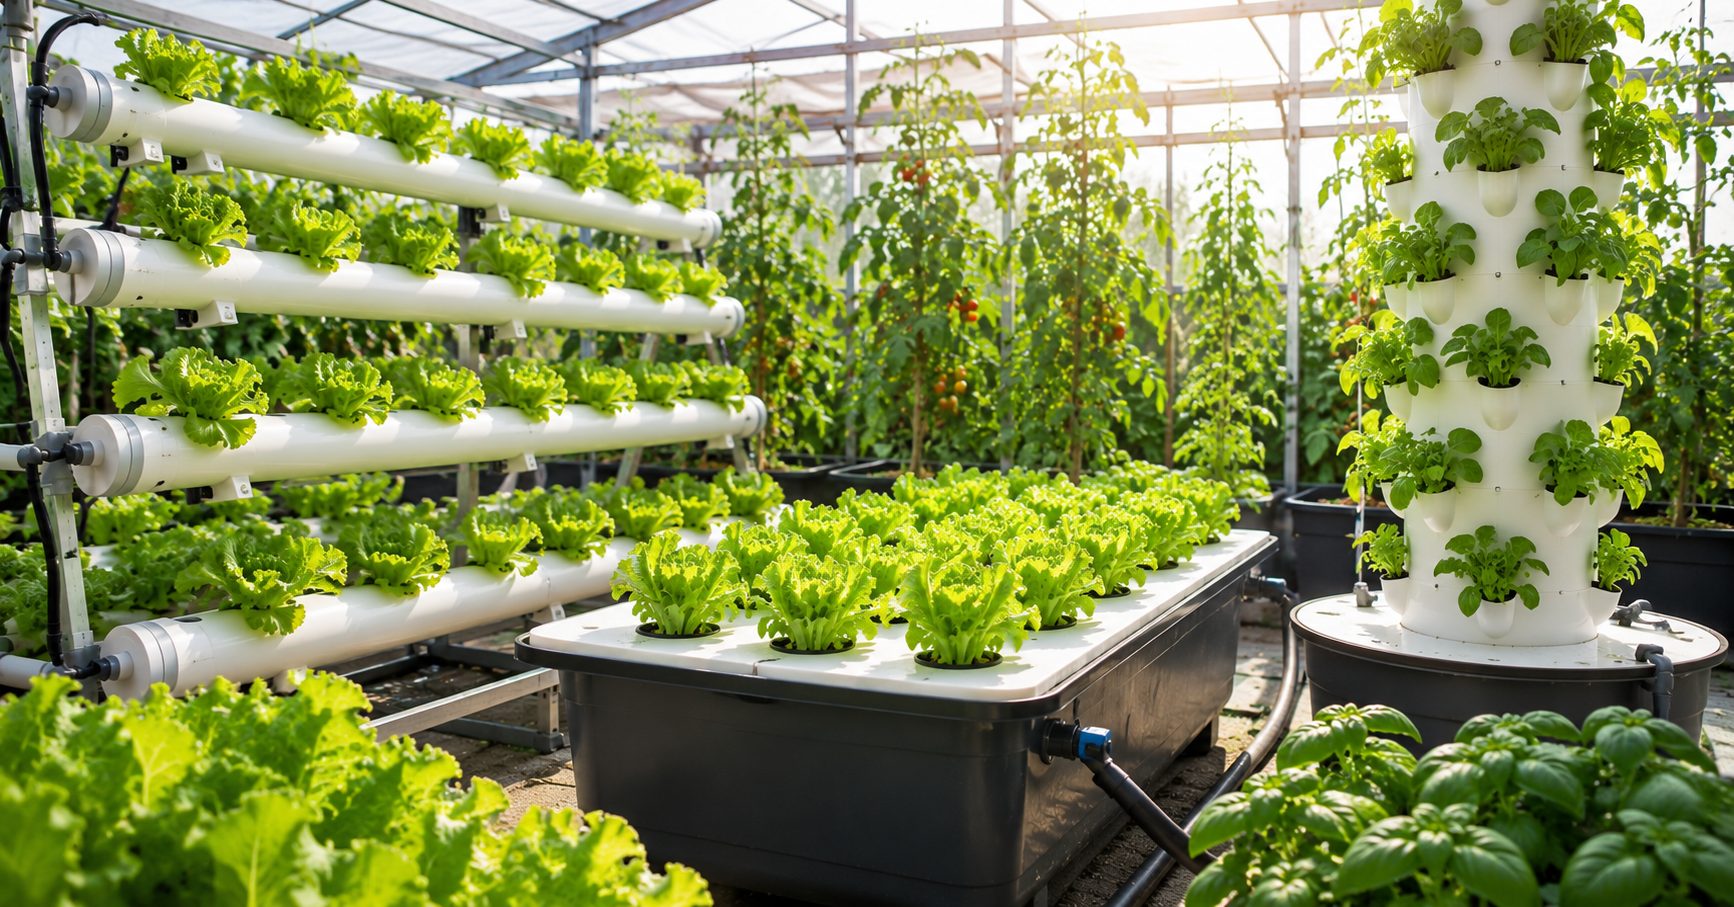
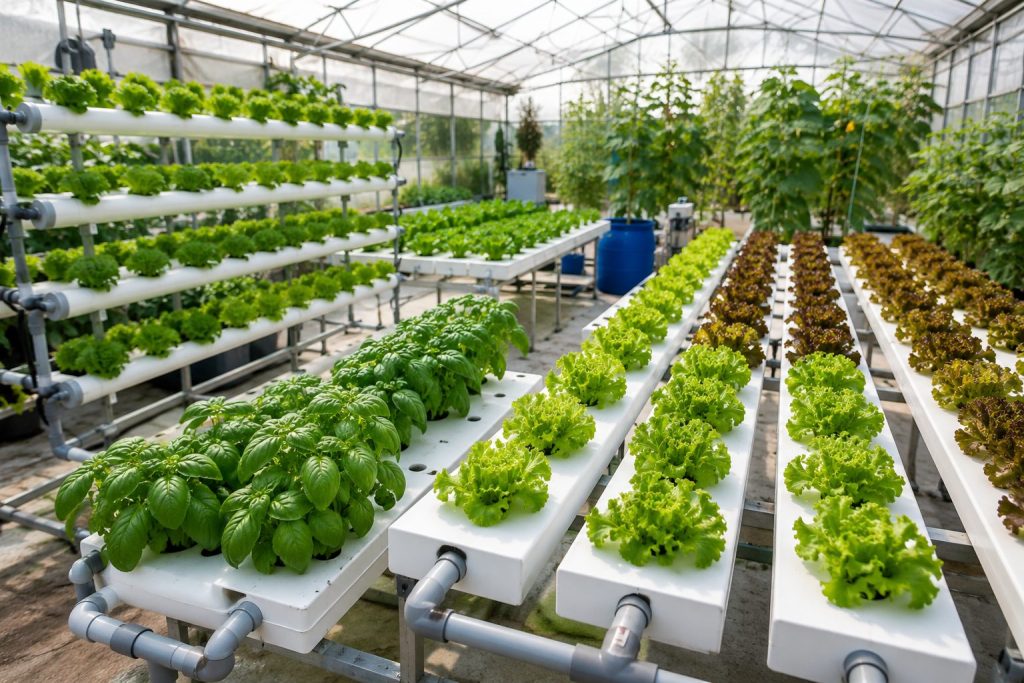
Nutrient Film Technique (NFT)
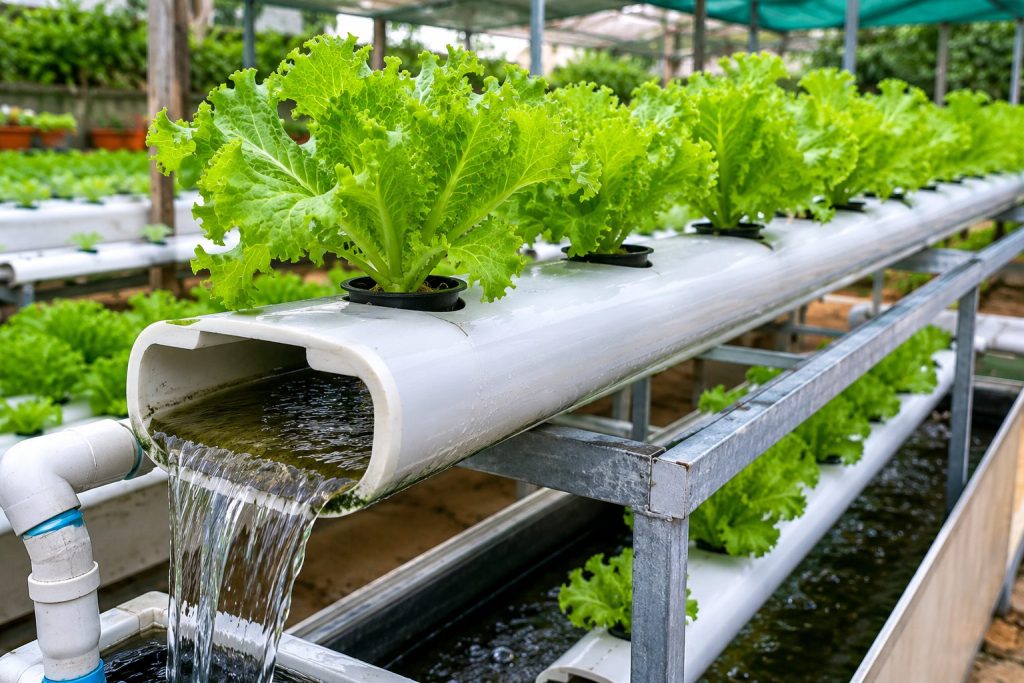
NFT is what commercial lettuce operations run on. Those long rows of white channels you see in greenhouse footage, with plants growing at intervals and water flowing silently through? That’s NFT. It’s efficient, scalable, and produces excellent results. It’s also not the right first system for most beginners, and it’s worth understanding why before you’re tempted by how professional it looks.
The basic principle: nutrient solution is pumped from a reservoir to the top of slightly angled channels, flows in a thin film down past plant roots, and drains back to the reservoir in a continuous cycle. Roots are partially submerged in that thin film; the upper portion stays in air, which provides oxygen without needing a separate air pump.
That’s genuinely elegant. The problem is the word “thin.”
Because roots are only partially submerged, there’s almost no buffer if flow is interrupted. In DWC, a pump failure means you have several hours sometimes longer before roots start declining. In NFT, roots can be in serious trouble within an hour or two of the pump stopping. For someone still learning their system, that response window is uncomfortably small.
When NFT makes sense
- You’ve already run a simpler system and understand nutrient management and pH
- You want to grow large quantities of leafy greens efficiently
- You have a controlled environment where temperature and flow can be monitored reliably
- You understand pump maintenance and have a backup plan if things fail
When NFT doesn’t make sense
- It’s your first hydroponic system
- You travel or have inconsistent availability to check on your garden
- You want to grow anything other than leafy greens and small herbs
- Your setup space has variable temperatures
The channel slope matters more than beginners realise. Too steep and the film runs too fast, roots barely getting moistened. Too flat and solution pools, creating anaerobic patches. Getting the angle right takes some trial and error that’s easier to do when you already have a baseline understanding of how your plants should look.
For beginners, NFT is better treated as a destination than a starting point. Learn the basics in DWC or Kratky, then consider moving to NFT when you want to scale up your greens production.
The Kratky Method
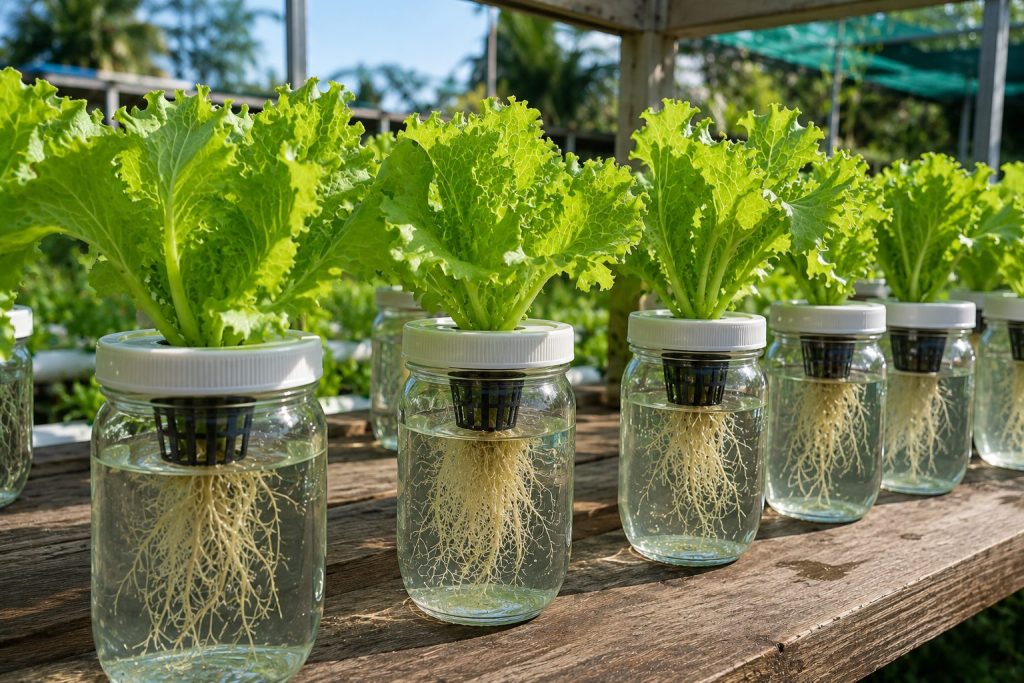
If DWC is the best active beginner system, Kratky is the best system for beginners who don’t want to deal with any electricity, pumps, or moving parts at all and still want to grow real food.
Developed by B.A. Kratky at the University of Hawaii, the method is often called “passive hydroponics,” which is technically accurate but undersells how complete the concept is. Plants sit in net pots over a sealed reservoir of nutrient solution. As the plant grows and absorbs the solution, the water level drops naturally. That dropping water level creates an air gap between the surface and the net pot and the roots that were once submerged now split into two zones: lower roots reaching into the solution, upper roots breathing air in the gap.
No pump maintains this. No timer controls it. The plant manages its own oxygen-to-water ratio as the reservoir drains. It’s one of those ideas that sounds too simple to work, until you actually try it and watch lettuce grow faster than you expected from a jar sitting on your kitchen bench.
What makes Kratky genuinely useful
The honest answer is that it removes almost every failure point that trips up beginners. There’s no pump to fail, no tubing to block, no timer to misfire. You mix nutrients once, fill the reservoir to the right level, check pH, and then largely leave it alone. For a small lettuce or herb setup, you might check on it twice a week once to look, once to top up if needed.
Cost is also genuinely low. You can build a four-plant Kratky setup with a $10 tote container from a supermarket, $20–30 worth of nutrients, a pack of net pots, some growing medium, and a small LED grow light if you’re not near a window. Under $80 total to be growing your first herbs or lettuce, with no ongoing electricity costs for pumps.
For apartment living, the near-silent operation is worth mentioning. No pump hum. No trickling water. Nothing that a housemate or landlord would notice.
Where Kratky falls short
It’s not a system for plants that want to grow for months. A reservoir that supports a head of lettuce through a 35-day cycle will run dry long before a tomato plant gets anywhere near fruiting. The passive nature of the system also means less opportunity to course-correct mid-cycle if you notice a deficiency developing, your options are more limited than in an active system where you can adjust the nutrient solution on the fly.
And let’s be honest: the lack of a pump means there’s less aeration than DWC, which can slightly affect growth rates for some plants. Most people growing herbs and lettuce in Kratky containers won’t notice the difference. Growers trying to push maximum yields might.
Who should actually start with Kratky?
Someone who wants the simplest possible entry into hydroponics. Apartment growers with limited space and no interest in managing equipment. People who travel for work and need a system that can cope with a few days without attention. And honestly, anyone who’s a bit intimidated by the pump-and-tubing setup of active systems and wants to prove to themselves that hydroponics works before investing more. Start here, grow something successfully, then decide if you want to go deeper.
Wick Systems: Fine for Experimenting, Limited for Real Growing
The wick system is hydroponics at its most basic. Growing medium sits above a reservoir, and absorbent wicks cotton, felt, or nylon rope draw nutrient solution up from the water through capillary action. No pump, no electricity, no complexity.
The problem is that wick delivery is slow by nature. It works adequately for small, slow-growing plants in low-light conditions. Small herb varieties, microgreens, seedlings that’s the realistic range. Anything with higher water demand quickly outpaces what a wick can deliver. You’ll see waterlogged medium near the wick and drought stress further from it.
Most growers who start with a wick system move on pretty quickly. It’s not a bad first experiment it teaches you about growing medium, nutrient mixing, and pH in a low-stakes environment. But if you want to actually grow food consistently, Kratky does everything a wick system does and significantly more.
Think of the wick system as a proof of concept, not a long-term setup.
Ebb and Flow (Flood and Drain)
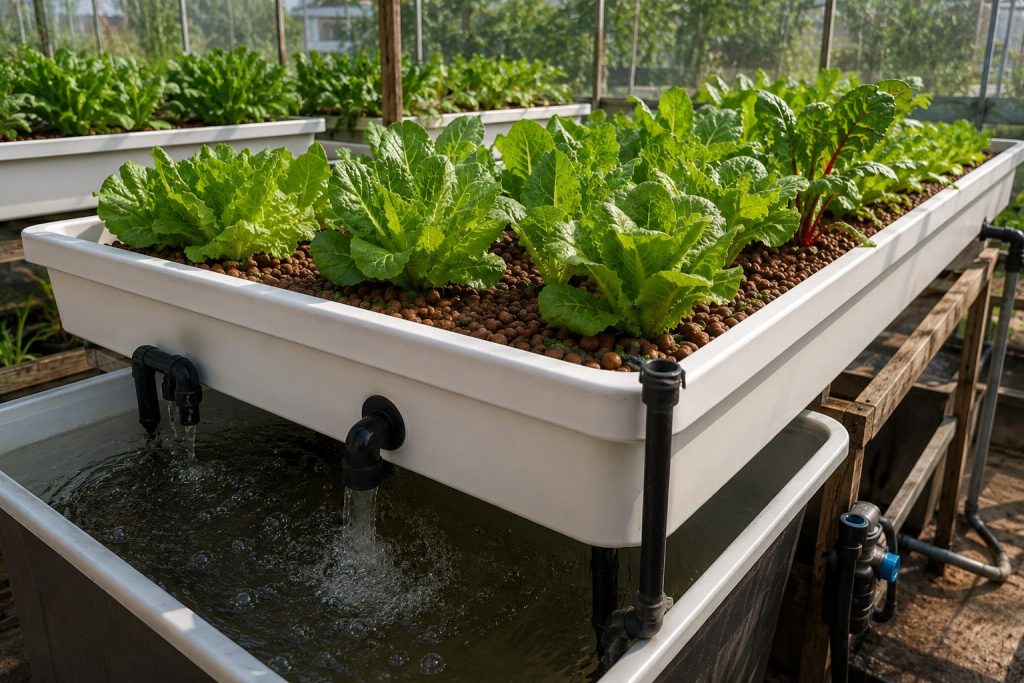
Ebb and flow is a system that makes a lot of sense once you understand it, but requires more upfront setup knowledge than the simpler options. A tray of plants in growing medium sits above a reservoir. A pump on a timer periodically floods the tray with nutrient solution from below roots get bathed in nutrients, then the solution drains back down. Repeat several times a day.
The appeal is real flexibility. Because you’re flooding a tray rather than running solution past bare roots, you can grow plants in individual containers with whatever growing medium they prefer. Coco coir, clay pebbles, perlite, rockwool mix and match. This also means you can grow a wider variety of plants in one system, including fruiting vegetables that aren’t well-suited to simpler setups.
The catch for beginners: there are more components to get right. Pump, timer, overflow fitting, flood tray, drain fitting, and tubing each one a potential failure point. Getting the flood frequency right for your specific growing medium and plant mix takes some learning. Too many floods and medium stays waterlogged; too few and roots dry out between cycles.
Ebb and flow is worth considering once you’ve got a crop or two under your belt and you want to move beyond herbs and leafy greens into capsicums, chillies, or small tomato varieties. For a first system, there are better options.
Vertical Hydroponic Systems
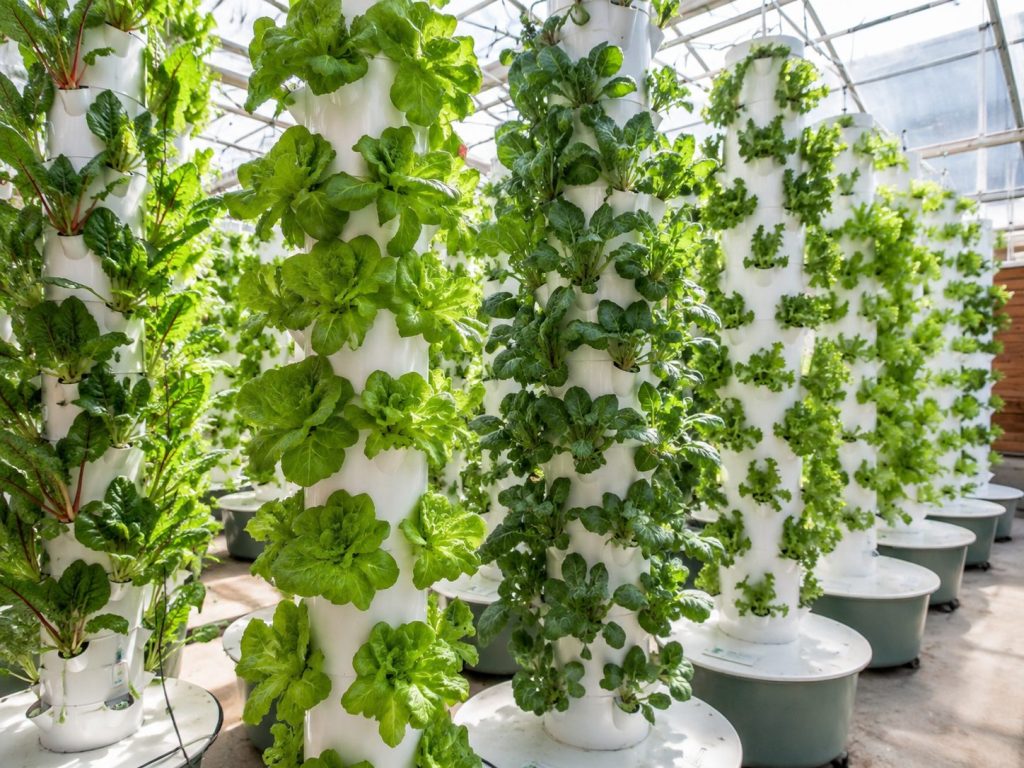
Most apartment growers run into the same problem at some point: they have more plants they want to grow than usable floor or bench space. A single DWC tote takes up a meaningful chunk of a kitchen bench. Four of them would take over the room. That’s where vertical systems stop being a novelty and start being genuinely practical.
The idea is straightforward: instead of spreading plants across a horizontal area, you stack them upward. A tower that occupies a 30cm × 30cm floor footprint can support 20 or more planting sites. A wall-mounted panel garden covers vertical space that would otherwise just be wall. The math on square metres of food per square metre of floor space becomes dramatically more favourable.
Most vertical systems use a pump-fed drip or NFT-style flow internally nutrient solution is pumped to the top and trickles down past each planting site. Complete kit systems with built-in LED grow lights (like the Lettuce Grow Farmstand) have made this much more accessible for home growers who don’t want to build anything from scratch. The all-in-one format removes most of the setup complexity.
The honest trade-off: vertical systems work brilliantly for leafy greens, herbs, and strawberries. They’re not suitable for anything that grows large, gets heavy, or needs deep root space. Tomatoes, cucumbers, large pepper plants these want a horizontal setup with more root volume. But if your goal is a reliable supply of salad greens and fresh herbs, a vertical tower delivers more food from less space than any other option.
For apartment residents, the aesthetics matter too. A well-set-up vertical tower under warm-spectrum LEDs looks genuinely attractive. It’s one of the few hydroponic setups that non-gardening housemates will actually compliment rather than question.
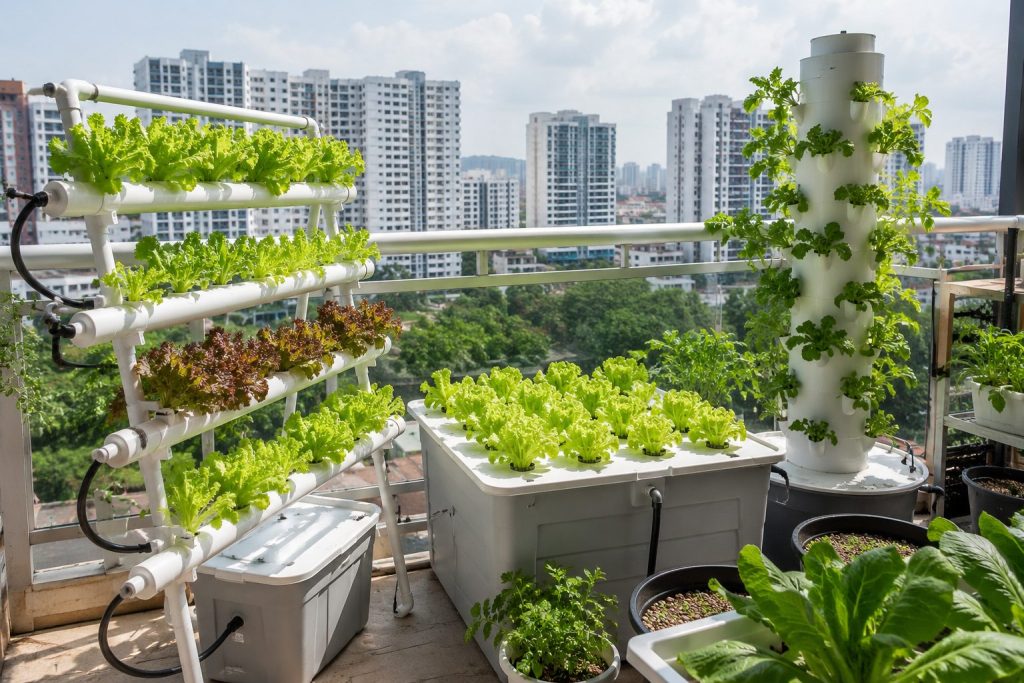
Best Hydroponic System for Apartments
The constraint in apartment growing is almost always space, not budget or knowledge. The right system for a house with a spare room is often completely wrong for a small apartment where you’re working with a kitchen bench, a balcony edge, or a corner of the living room.
Start with Kratky. A few opaque containers on a shelf under a $30 LED strip light, and you can grow herbs and cut-and-come-again lettuce year-round in essentially any apartment. The footprint is whatever you decide it is. You can start with three jars on a windowsill and expand to a full shelf system without changing your method. No noise, no drips, no equipment footprint beyond the containers themselves.
Step up to DWC when you want faster growth and more control than Kratky provides, and you have enough consistent bench or shelf space for a single tote or bucket. A compact DWC setup inside a small grow tent is the most popular choice for apartment growers who’ve outgrown Kratky and want a more controlled environment the tent manages light, humidity, and smell all in one.
Move to a vertical system when you want to produce enough greens to make a real difference to your weekly grocery shop. This is where apartment growing genuinely starts to feel like food production rather than just a hobby. The ongoing pump maintenance of a vertical system is manageable, and the output per square metre is hard to match with any horizontal setup.
One thing apartment growers learn quickly: reliability matters more than maximum yield. A system that occasionally fails while you’re at work or away for a long weekend is genuinely stressful in a small space. Prioritise low-maintenance over high-performance until you understand your system’s failure modes.
Best Hydroponic System for Singapore
Singapore is one of the more interesting environments to grow hydroponics in, and the challenges are specific enough that generic advice doesn’t always apply.
The year-round high ambient temperature is the biggest variable. In a typical Singapore apartment without air conditioning running, indoor temperatures often sit between 28–32°C. For DWC growers, this is a genuine problem warm nutrient solution holds less dissolved oxygen, which stresses roots even when the air pump is running correctly. You’ll also see faster bacterial and algae growth in warm reservoirs, which means more frequent maintenance and cleaning.
The practical options for managing this: grow in an air-conditioned room (the most reliable solution but not always possible), use heavily insulated reservoirs, or choose a method that’s less sensitive to water temperature in the first place.
Kratky in Singapore is underrated. Without a pump adding any heat load to the system, and with roots in a sealed reservoir away from direct heat sources, solution temperatures stay more stable than in active systems. Put your containers in the coolest interior space you have away from windows that get direct afternoon sun and temperature becomes manageable.
Vertical systems with LEDs in an air-conditioned room are the choice of Singapore’s more serious home growers. It eliminates both the temperature problem and the light problem simultaneously, and the compact footprint suits HDB living. Running the AC specifically for your plants adds to electricity costs, but most growers find a small system doesn’t require keeping the whole room arctic a stable 24–26°C is enough.
For balcony and corridor growing, the picture changes. Singapore’s heat is actually an advantage for certain crops. Kangkong (water spinach), bayam (amaranth), kai lan, and most local leafy Asian greens genuinely prefer warm conditions. A simple NFT channel or large Kratky tote on a shaded balcony, growing these heat-tolerant crops, can produce significant harvests without any temperature management at all. The caveat: direct sun will overheat your solution, so shade is non-negotiable.
Commercial NFT farms like Sky Greens work well at scale in Singapore, but they have controlled environments that home growers can’t replicate without significant investment. Don’t look at commercial Singapore hydroponics and assume you can recreate it on a HDB balcony without modifications.
Best Hydroponic System for Australia
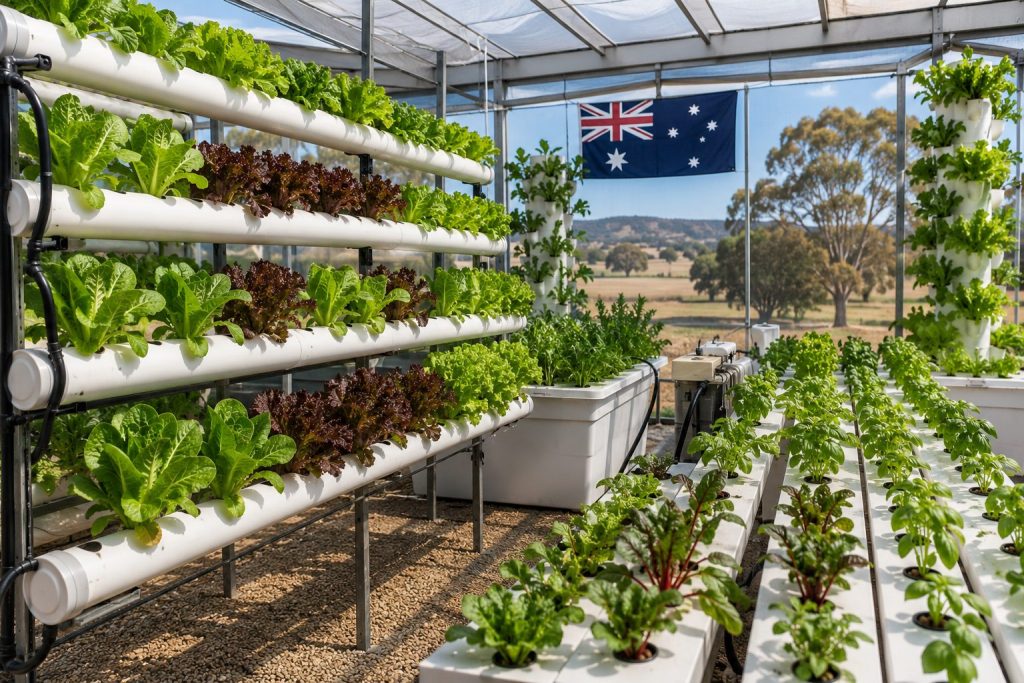
Australia’s growing conditions are harder to generalise than Singapore’s, because the country is simply enormous and wildly varied. A Melbourne grower and a Brisbane grower have almost opposite seasonal concerns.
That said, most beginners are growing indoors, which narrows the variables considerably.
The Australian summer is the main challenge for indoor growing in most states. NSW, QLD, and WA in particular see indoor temperatures that affect reservoir health in DWC systems in exactly the same way Singapore’s ambient heat does. Grow tents with active ventilation and cool-running LED lights create a stable microclimate that’s fairly independent of what’s happening outside this is why grow tent setups are so popular among serious Australian hobbyists.
The Australian winter is the reverse problem that Singapore growers never have to think about. In Victoria, Tasmania, and parts of SA and NSW, growing rooms can drop to temperatures that significantly slow plant growth. Root zone temperature below about 18°C and you’ll see visibly slower development even in a well-managed DWC. Insulating reservoirs helps, and some growers use small aquarium heaters to stabilise solution temperature through winter.
For Melbourne and southern state growers specifically: DWC in a grow tent with temperature management is the most reliable year-round setup. The tent handles both seasons you can ventilate to cool in summer, and the enclosed environment retains warmth better in winter than an open system would.
For Queensland and WA growers: The Kratky method is worth serious consideration because it avoids the pump-and-warm-water problem of active systems. Keep reservoirs away from exterior walls that heat up during the day, use opaque containers, and choose a cool interior space.
Ebb and flow appeals to a significant portion of Australian growers because of the plant variety it supports. Australians tend to want to grow more than just lettuce capsicums, chillies, cherry tomatoes, and herbs are common targets. Ebb and flow’s flexibility with growing media and plant types makes it a natural step up from starter systems once you’re ready to expand.
Systems to Avoid Until You Know What You’re Doing
This section is probably more useful than most guides admit.
Commercial-scale NFT setups are sold to home growers and they’re usually the wrong choice at that stage. Multi-channel systems require precise installation angles, consistent pump performance, and enough experience to diagnose channel blockages and flow irregularities quickly. A beginner running six channels of NFT who notices two channels looking different from the others has almost no framework to figure out what’s gone wrong. These systems belong in the intermediate category at the earliest.
Fully automated systems with EC and pH dosers are genuinely impressive tools, and they’re also a terrible learning environment. When your nutrient strength and pH are being managed automatically, you never actually learn to read your plants. You also have three possible culprits for every problem: the automation, the plants, or the environment. Beginners need fewer variables, not more. Get comfortable with manual pH management first it teaches you more than any automated system can.
Aeroponics is the system that gets covered in every overview article but almost no one should start with. True aeroponics where fine mist nozzles spray roots with nutrient solution produces extraordinary results in the right hands. It’s also the system that kills plants fastest when something goes wrong. Clogged nozzles, pump failure, timer malfunction any of these can damage roots in under an hour. Even experienced growers find it temperamental. There’s no beginner argument for starting here.
Oversized ebb and flow a large multi-tray flood-and-drain system with complex plumbing shares the “too many variables” problem. A small single-tray ebb and flow setup is manageable and educational. A large system with multiple trays, separate timers, and dozens of plants is a lot to diagnose when something goes wrong and you’re still learning the basics.
The principle worth internalising: every component you add to a system is a new thing that can fail and a new skill you need to have. Start with the minimum viable setup. Scale up once you genuinely understand what you’re scaling.
Common Beginner Mistakes (And What to Do Instead)
These aren’t theoretical they’re the things that consistently trip up new growers. Work through this list before your first grow, not after.
1. Ignoring pH until something goes wrong
This is probably the single most common cause of beginner failure, and it’s almost entirely avoidable. pH determines whether plants can actually absorb the nutrients in your solution a reservoir with perfect nutrient levels but pH outside the 5.5–6.5 range will produce deficiency symptoms that look exactly like a nutrient problem. New growers add more nutrients. Plants get worse. The cycle continues.
Buy a digital pH meter, not drops. Drops are imprecise and annoying to read accurately. Check pH every time you top up your reservoir. Calibrate your meter every few weeks with calibration solution.
2. Assuming tap water is neutral and clean
Tap water in Singapore is reliably decent. Tap water in parts of rural Australia can be highly alkaline, heavily mineralised, or chlorinated enough to affect beneficial microbial activity in your growing medium. High starting pH means you’re fighting your water chemistry every time you mix nutrients. High mineral content (high baseline EC) means you have less control over your actual nutrient concentration.
Test your tap water before you start. A baseline pH and EC reading takes two minutes and saves a lot of confusion later. If you’re on chlorinated mains water, letting it sit uncovered for 24 hours before use, or running it through a simple filter, reduces chlorine significantly.
3. Overfeeding nutrients
The nutrient bottle says to use 5ml per litre. Beginners often reason that 7ml per litre should produce even better results. It doesn’t it produces nutrient burn, those distinctive brown and crispy leaf tips that signal salt stress. In hydroponics especially, more is not better. Roots are in constant contact with the solution, and there’s no soil buffer to absorb excess salts.
Start at half the recommended dose. Increase gradually as your plants mature and you get a feel for their appetite. Your plants will tell you when they want more strong, deep green growth with no tip burn means you’re in the right range.
4. Underestimating your lighting situation
The most politely phrased version of this: most indoor spaces don’t have enough natural light for productive hydroponics. A bright-looking window that gets a few hours of direct sun might feel like plenty. Plants measuring photosynthetically active radiation (PAR) would disagree.
If you’re serious about growing food indoors, a dedicated LED grow light is worth the investment. Full-spectrum quantum board LEDs have become genuinely affordable a decent 100W panel for under $100 will cover a 60cm × 60cm growing area effectively. The improvement over natural window light is usually dramatic and immediately visible.
5. Not watching reservoir levels closely enough
Fast-growing leafy greens in warm conditions can pull a surprisingly large amount of water from a reservoir in a short period. In a Kratky setup, a reservoir dropping too low means the air gap disappears and roots get submerged which disrupts the oxygen balance the system depends on. In DWC, low reservoir levels mean roots hanging in air above the waterline rather than submerged.
Mark your target reservoir level on the outside of your container with a permanent marker. Check it every two to three days, more frequently in hot weather. Top up with pH-adjusted water (without necessarily adding nutrients every time just water until your next scheduled nutrient change).
6. Warm water problems
This comes up repeatedly in warm-climate growing and it’s worth understanding properly. Dissolved oxygen and water temperature have an inverse relationship as water warms, it holds less oxygen. At 24°C, oxygen levels are meaningfully lower than at 20°C. At 28°C, you’re in root-stress territory even with a pump running. The symptoms brown slimy roots, slow growth, yellowing leaves look like a nutrient deficiency but won’t respond to nutrient changes.
If your growing space runs warm, insulate your reservoir (foam wrap works), keep it away from heat sources, and consider whether an aquarium chiller is worth it for the size of your setup.
7. Starting with the wrong plants
Tomatoes look appealing as a first grow. They’re exciting, they produce food you can actually see, and they’re everywhere in hydroponic videos. They’re also one of the more demanding crops high water volume requirements, nutrient ratios that shift significantly between vegetative and fruiting stages, long growing cycles, structural support needs, and strong lighting requirements.
Start with lettuce, basil, spinach, or Asian greens. They grow fast enough to give you feedback within weeks, have forgiving nutrient requirements, and produce satisfying harvests without demanding much in return. You’ll have a much better foundation for growing tomatoes after you’ve successfully grown three or four crops of something easier.
8. Neglecting reservoir cleanliness
A reservoir that’s never cleaned develops biofilm a slimy coating on interior surfaces that harbours bacteria and provides a substrate for algae. Algae in a reservoir competes with your plants for dissolved oxygen and can quickly become a recurring problem once established.
The fix is simple but requires consistency: cover your reservoir completely so no light reaches the solution (algae requires light), clean all components thoroughly between growing cycles with a diluted bleach solution or hydrogen peroxide, and rinse well before refilling. If algae appears mid-cycle, a small amount of 3% food-grade hydrogen peroxide (3–5ml per litre of solution) treats it without harming plants.
9. Forgetting about air circulation
Stagnant air in an enclosed growing space is a reliable way to encourage fungal problems. Botrytis, powdery mildew, and damping off all thrive in still, humid conditions. Plants also develop stronger stems when they experience slight movement the same mechanical stimulation they’d get from outdoor breezes.
A small clip fan directed gently at your plants costs almost nothing and makes a real difference, especially in grow tents or enclosed spaces. If you’re using a grow tent, set up intake and exhaust ventilation so air is actively moving through, not just circulating inside.
10. Overbuilding your first system
The impulse is understandable if you’re going to set up a hydroponic system, you might as well do it properly. The problem is that “properly” for a beginner means something much simpler than most people assume. A complex, expensive first setup doesn’t produce better crops for a beginner. It produces more troubleshooting, more variables, and more opportunities for something to go wrong that you don’t understand yet.
Start with the simplest setup that will actually teach you something. Upgrade once you’ve identified a specific limitation in your current setup not because a more complicated system looks more impressive.
11. Not keeping records
You will change your nutrient concentration, adjust your pH, try a different growing medium, or modify your light schedule at some point. When your plants respond differently than expected better or worse you’ll want to know exactly what changed. Without records, you’re guessing.
A note on your phone works fine. Record the date, your nutrient brand and concentration, pH, EC, any changes you made, and a quick observation about how the plants look. The habit takes two minutes and pays for itself the first time something goes wrong and you actually have data to work with.
12. Expecting overnight results
Hydroponics grows plants faster than soil. It doesn’t grow them in days. Lettuce still takes 5–7 weeks from seed. Herbs take longer. The difference in speed versus soil becomes obvious when you compare side-by-side, but it’s not obvious when you’re checking your system every 12 hours hoping to see dramatic change.
Take photos from the same angle every week. Growth that seems invisible day-to-day becomes obvious over two or three weeks. The perspective shift is genuinely motivating most beginners underestimate how much their plants actually grew in the first month.
Final Verdict
After comparing every option honestly, here’s where things land.
Best Overall Beginner System: Deep Water Culture (DWC)
DWC is the recommendation you’ll find from most experienced growers looking back at where they started, and it earns that position. It’s affordable, produces visible results fast enough to stay motivated, teaches you the fundamentals you’ll use in every system you ever run, and has enough forgiveness built in that the inevitable beginner mistakes don’t become disasters. A single DWC tote under a decent LED light is a complete growing setup. Start here.
Best Budget System: Kratky Method
If your goal is to grow real food with the smallest possible financial commitment and the least possible equipment involvement, Kratky is genuinely hard to beat. The near-zero running costs, silent operation, and flexible container options make it the obvious choice for apartment growers who want to ease into hydroponics without overcommitting. It has real limitations for ambitious growing, but as a starting point it’s excellent.
Best Apartment Option: Vertical Hydroponics
Once you’ve got the basics down and want to produce enough greens to make a meaningful contribution to your weekly meals, a vertical system is where apartment growing starts to feel serious. The food-per-square-metre ratio is difficult to match any other way, and modern kit systems have removed most of the technical friction. Not a first system, but a very natural next step.
Best System for Future Expansion: NFT
For growers who want to eventually produce large quantities of leafy greens consistently and efficiently, NFT is the logical destination. Commercial operations use it for good reasons it’s water-efficient, scalable, and produces excellent results once dialled in. The catch is that it rewards experience. Do your learning in DWC first, and NFT will make much more sense when you get there.
One last thing worth saying plainly: the system matters less than the habit of paying attention. A $30 DWC setup tended thoughtfully will outperform a $500 automated system that gets checked once a week. Hydroponics rewards observation the grower who notices when leaves start to look slightly wrong and adjusts before it becomes a problem will always grow better plants than the one who sets it and forgets it.
Start small. Learn the system. Grow something successfully. Then decide what you want to build next.