So you’ve decided to start a hydroponic garden indoors. Maybe you live in a compact HDB flat in Australia or a high-rise apartment in Sydney. Maybe you’re frustrated paying supermarket prices for herbs that wilt before you even get them home. Or maybe you’re just genuinely curious whether you can grow your own food without a single handful of soil.
The good news? You absolutely can. But here’s the part most beginner guides quietly skip over: your plant selection matters just as much as your system.
This is where a lot of new growers stumble. They invest in a decent setup, get excited, and then immediately try to grow something complicated like cucumbers or watermelons and wonder why everything goes sideways. Picking the wrong crops at the start is one of the most reliable ways to get discouraged and quit.
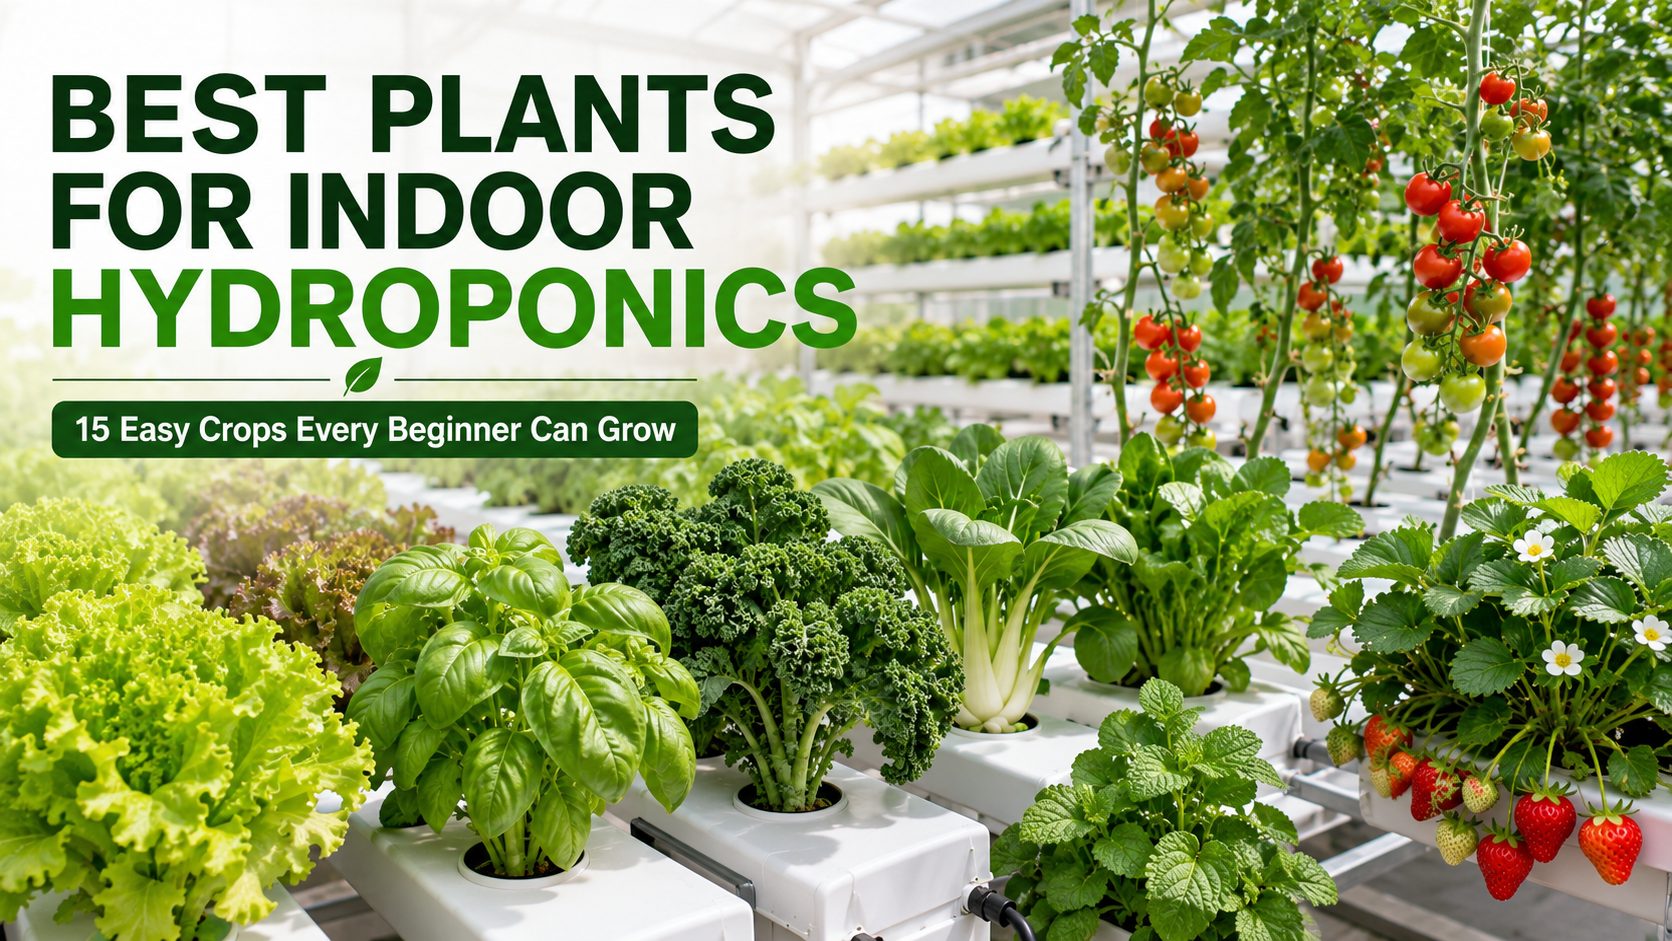
This guide exists to prevent exactly that. We’ve put together a carefully considered list of the 15 best plants for indoor hydroponics all beginner-friendly, most fast-growing, and every one of them genuinely worth your time and shelf space. Whether you’re setting up in a compact Singapore flat, a Melbourne apartment, or anywhere else with limited outdoor access, there’s something here you can realistically start growing this week.
One thing worth knowing upfront: The plants that work best hydroponically tend to share a few common traits. Understanding those traits first will help you make smarter decisions as you expand your grow setup beyond this starter list.
What Makes a Plant Good for Hydroponics?
A plant is well-suited for hydroponics if it has a fast growth rate, shallow root system, tolerance for minor nutrient and pH variations, adaptability to LED grow lights, and a compact above-ground size. Leafy greens and herbs like lettuce, basil, and mint meet all five criteria, which is why they dominate beginner hydroponic crop lists.
Not every crop thrives when grown without soil, and some are genuinely terrible choices for beginners not because hydroponics can’t grow them, but because the effort and infrastructure required is well beyond what a starter setup can provide.
The 5 Key Traits of a Good Hydroponic Plant
- Fast growth rate — Plants that go from seed to harvest in 3–5 weeks keep you engaged, give you more practice cycles, and help you learn faster. Slow crops like peppers can be demoralising when you’re still figuring out your pH balance.
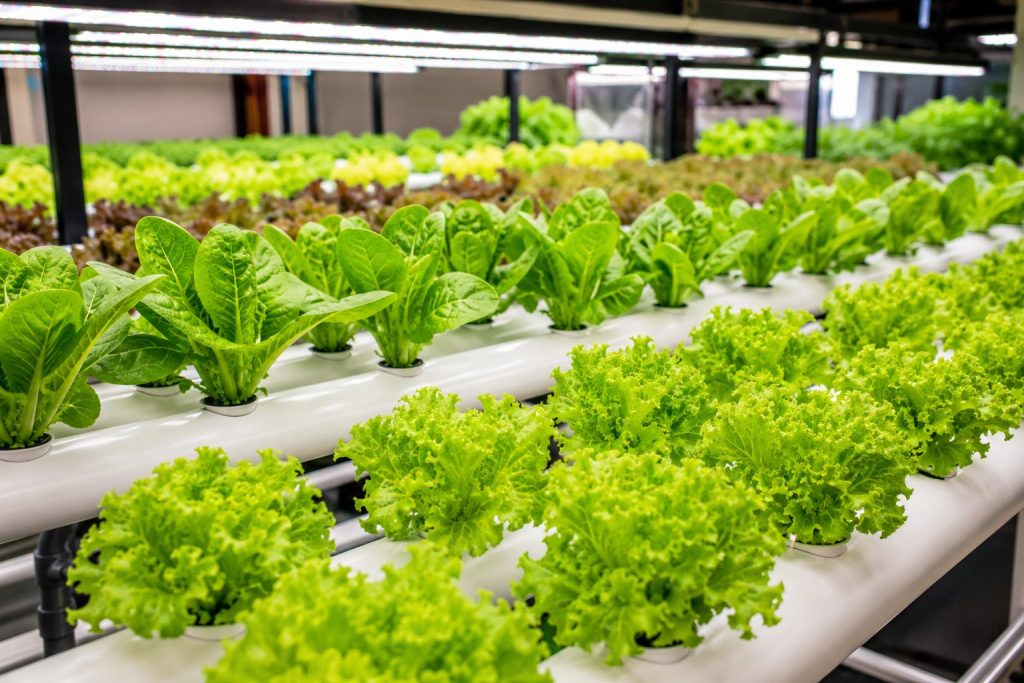
- Shallow, compact root systems — Deep-rooted plants need large reservoirs, extensive growing media, and more complex infrastructure. Shallow-rooted crops lettuce, herbs, most leafy greens work beautifully in the most common beginner systems: NFT (Nutrient Film Technique), DWC (Deep Water Culture), and the ultra-simple Kratky method.
- Tolerance for beginner variability — pH swings, minor nutrient imbalances, inconsistent light schedules these happen when you’re learning. The best beginner crops can handle some variation without immediately punishing you for it.
- Indoor light adaptability — Many crops that perform well outdoors struggle under artificial lighting. The plants on this list respond well to standard LED grow lights, which is essential for apartment growers who can’t rely on direct sunlight for 6+ hours daily.
- Compact above-ground size — Fruiting plants like tomatoes and peppers grow large, need trellising or staking, and take up significant vertical space. For apartment growers especially, compact plants that stay manageable are far more practical.
A common mistake beginners make is assuming that if a plant grows well in a garden, it’ll grow just as well hydroponically. The two environments have very different constraints. Some soil crops like root vegetables are biologically incompatible with standard hydroponic systems. Others, like basil and lettuce, actually thrive better in hydroponics than in soil once you get the basics right.
Quick Comparison Table
| Plant | Difficulty | Days to Harvest | Best System | Ideal EC | Ideal pH |
|---|---|---|---|---|---|
| Lettuce | Very Easy | 30–45 days | DWC, NFT, Kratky | 0.8–1.2 | 6.0–7.0 |
| Basil | Very Easy | 25–35 days | DWC, Kratky | 1.0–1.6 | 5.5–6.5 |
| Mint | Very Easy | 20–30 days | Any system | 1.2–1.6 | 6.0–7.0 |
| Spinach | Easy | 30–40 days | DWC, NFT | 1.2–2.0 | 6.0–7.0 |
| Kale | Easy | 40–60 days | DWC, NFT | 1.6–2.5 | 5.5–6.5 |
| Green Onions | Very Easy | 21–30 days | Kratky, DWC | 1.2–1.8 | 6.0–7.0 |
| Chives | Very Easy | 30 days | Any system | 1.2–1.6 | 6.0–7.0 |
| Parsley | Moderate | 35–45 days | DWC, NFT | 0.8–1.8 | 5.5–6.0 |
| Cilantro | Moderate | 21–28 days | Kratky, DWC | 1.2–1.8 | 6.2–6.8 |
| Bok Choy | Easy | 30–45 days | DWC, NFT | 1.2–2.0 | 6.0–7.0 |
| Arugula | Very Easy | 21–30 days | Kratky, DWC | 0.8–1.6 | 6.0–7.0 |
| Swiss Chard | Easy | 35–50 days | DWC, NFT | 1.6–2.3 | 6.0–7.0 |
| Strawberries | Moderate | 60–90 days | DWC, Aeroponics | 1.4–2.0 | 5.5–6.5 |
| Cherry Tomatoes | Challenging | 60–80 days | DWC, Ebb & Flow | 2.0–3.5 | 5.5–6.5 |
| Peppers | Challenging | 70–90 days | DWC, Ebb & Flow | 2.0–3.0 | 5.5–6.5 |
Note on EC ranges: EC (Electrical Conductivity) measures nutrient solution strength. Seedlings and young plants always start at the lower end of the range. Many beginners overfeed early on more nutrients is not always better, and can actually stunt growth or cause nutrient burn.
1. Lettuce — The Undisputed Beginner Champion
Difficulty: Very Easy | Growth Time: 30–45 days | Light: 12–14 hours/day | Ideal pH: 6.0–7.0
Lettuce is the best plant for beginner indoor hydroponics. It grows from seed to harvest in 30–45 days, tolerates pH fluctuations between 6.0–7.0, thrives under standard LED grow lights, and works in the simplest systems including the no-pump Kratky method. It’s the fastest confidence-builder available to new growers.
If there’s one plant that almost every serious hydroponic grower recommends for beginners and for very good reason it’s lettuce. For most new growers, it becomes the fastest confidence builder in their early months of hydroponics.
It has a shallow fibrous root system, tolerates minor pH fluctuations better than most crops, grows rapidly under modest LED lighting, and gives you a meaningful harvest in about a month. The feedback loop is fast enough that you can actually learn from each cycle.
Loose-leaf varieties are especially well-suited to beginners because you can harvest individual outer leaves continuously a technique called “cut-and-come-again” rather than waiting for the full plant to mature. One well-managed plant can supply a small household with fresh salad greens for weeks on end.
How to Grow Lettuce Hydroponically (Beginner Steps)
- Fill a Kratky container with pH-adjusted nutrient solution (EC 0.8–1.0, pH 6.0–6.5)
- Place seedling or seed pod in a 2-inch net pot filled with clay pebbles
- Set net pot so the bottom touches the nutrient solution
- Position under LED grow light at 12–14 hours per day
- Top up with plain pH-adjusted water as the reservoir drops
- Begin harvesting outer leaves from week 3–4 onward
- Replace plants every 45–60 days for continuous production
Best varieties: Butterhead, Romaine, Oakleaf, Loose-leaf types (like ‘Black Seeded Simpson’). For Singapore growers, heat-tolerant varieties like ‘Jericho’ or ‘Nevada’ are worth seeking out specifically.
Best system: Kratky (the simplest possible setup), NFT, or DWC
Beginner warning overfeeding: Many beginners underestimate how sensitive lettuce is to high nutrient concentrations. It’s a genuinely light feeder. Start at EC 0.8–1.0 and only increase once plants are established. Overfed lettuce develops brown leaf edges (tip burn) that’s often mistaken for a disease but is almost always a nutrition or calcium uptake issue caused by high salt concentrations or poor airflow.
Expert insight: Tip burn in lettuce is one of the most common problems in hydroponic growing at any scale even commercial operations deal with it. The solution isn’t always reducing nutrients; sometimes it’s improving air circulation so leaves can properly transpire and uptake calcium. A small USB fan pointed at your lettuce canopy can eliminate tip burn entirely in a home setup.
Beginner tip: Start with a Kratky setup a container, net pots, hydroton clay pebbles, and a basic nutrient solution. No pump, no timer, minimal monitoring. It’s a genuinely remarkable way to learn the fundamentals without being overwhelmed by equipment.
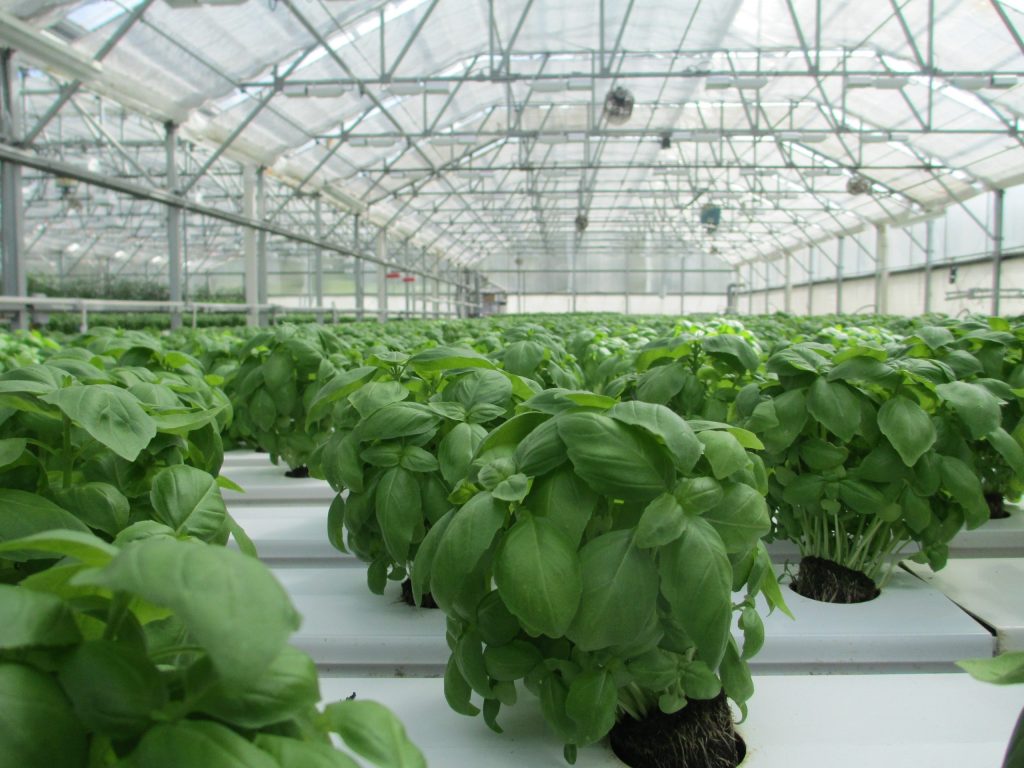
2. Basil — Your Kitchen’s Most Productive Herb
Difficulty: Very Easy | Growth Time: 25–35 days | Light: 14–16 hours/day | Ideal pH: 5.5–6.5
Basil is one of the most productive herbs for indoor hydroponics. A single plant in a DWC or Kratky system can supply continuous harvests in 25–35 days. It requires 14–16 hours of LED light daily, warm water temperatures around 20–25°C, and regular pruning to prevent flowering, which degrades flavour.
Many apartment growers are genuinely surprised by how productive a single basil plant becomes in a hydroponic setup. In soil, basil can be a bit temperamental prone to wilting, yellowing, and going to seed quickly. Hydroponically, given consistent nutrients, warmth, and good light, it tends to explode in the best possible way.
This becomes especially important in Singapore’s context: basil, particularly Thai Basil and Holy Basil (Kaphrao), is used in everyday cooking across the region. Having a continuously producing basil plant literally inches from your kitchen is a genuinely practical advantage, not just a novelty.
Basil Varieties Compared: Which Is Best for Hydroponics?
| Variety | Flavour Profile | Best Use | Heat Tolerance | Difficulty |
|---|---|---|---|---|
| Genovese | Classic sweet, anise-like | Pesto, Italian cooking | Moderate | Very Easy |
| Thai Basil | Spicy, licorice notes | Thai/Vietnamese dishes | High | Very Easy |
| Holy Basil (Kaphrao) | Peppery, clove-like | Singaporean/Malaysian stir-fries | High | Easy |
| Lemon Basil | Citrus, bright | Nyonya dishes, desserts | Moderate | Easy |
Best system: DWC or Kratky
Beginner warning flowering: The single most common basil mistake is letting it flower. Once basil sets flowers (called “bolting”), leaf production slows dramatically and the flavour becomes harsh and medicinal. Snip flower buds off the moment you see them. This isn’t optional it’s the difference between a plant that produces for months versus one that gives you three weeks of good growth before going bitter.
Expert insight: Basil is one of the few herbs where water temperature in your reservoir genuinely matters. Basil roots prefer slightly warmer water (around 20–25°C) compared to many other crops. In very cool air-conditioned rooms, reservoir temperatures can drop below 18°C and slow root development noticeably.
Beginner tip: Pinch off the top set of leaves at the main stem every 10–14 days. It feels counterproductive, but this triggers lateral branching and turns a single spindly plant into a dense, productive bush. The more deliberately you harvest, the more aggressively the plant regrows.
3. Mint — The Plant That Almost Refuses to Fail
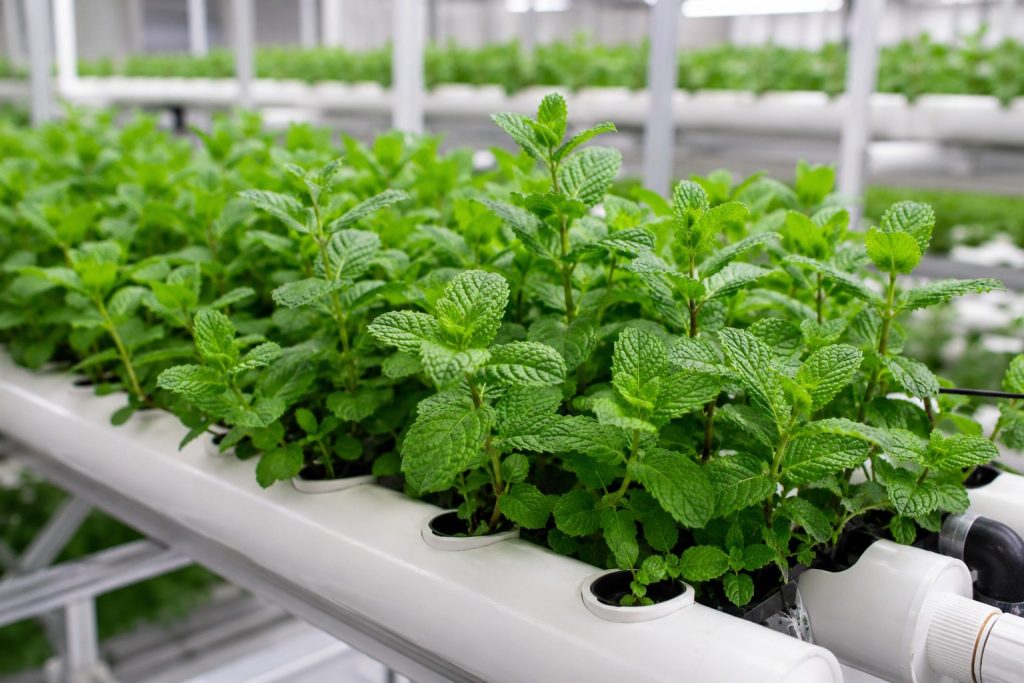
Difficulty: Very Easy | Growth Time: 20–30 days | Light: 12–14 hours/day | Ideal pH: 6.0–7.0
Mint is one of the easiest plants to grow hydroponically. It thrives in any system including a simple Kratky jar and grows best from cuttings rather than seed. Cuttings develop visible roots within 7 days and reach harvestable size in 20–30 days. Keep temperatures between 18–24°C to prevent leggy, low-quality growth.
Mint is one of those plants that almost seems determined to grow regardless of what you do to it. In soil, it’s legendary for being invasive left unchecked, a single mint plant will colonise an entire garden bed. In a hydroponic system, that same vigour becomes a genuine advantage. It’s fast, forgiving, and nearly impossible to kill as a beginner.
Mint Varieties for Hydroponics: Which Should You Grow?
- Spearmint — The most versatile everyday mint. Works in teas, cocktails, salads, and garnishes. Handles a wide range of indoor temperatures.
- Peppermint — Stronger menthol flavour; ideal for teas and desserts. Slightly more sensitive to heat than spearmint.
- Vietnamese Mint (daun kesum / Laksa Leaf) Essential in Singaporean laksa, Vietnamese pho, and Nyonya dishes. Heat-tolerant compared to European mint varieties. The best choice for Singapore growers.
- Chocolate Mint — Novelty variety with a cocoa-mint scent; excellent in desserts and cocktails.
Best system: Any system Kratky, DWC, NFT, even a glass of water on a sunny windowsill to start
Beginner warning, heat and legginess: Many beginners underestimate how much warmth affects mint’s growth pattern. Mint prefers temperatures between 18–24°C. In rooms consistently above 28°C, mint tends to grow tall and leggy rather than full and bushy. Regular pruning helps, but keeping temperatures reasonable is the real fix.
Apartment-specific advice: Mint is one of the few hydroponic crops where a basic mason jar on a bright windowsill can actually work as a starter setup. It won’t produce as prolifically as a proper DWC system, but it’s a near-zero-cost way to understand how the plant behaves before investing in equipment.
Beginner tip: Keep different mint varieties in separate containers they can cross-pollinate and the flavour of all varieties can become muddled over time if grown too close together in a shared reservoir.
4. Spinach — Nutrient-Dense, Low-Light, and No-Fuss
Difficulty: Easy | Growth Time: 30–40 days | Light: 12–14 hours/day | Ideal pH: 6.0–7.0
Spinach is an ideal hydroponic vegetable for apartment growers with modest LED setups. It reaches harvest in 30–40 days, tolerates lower light levels than fruiting crops, and produces continuous yields when outer leaves are harvested first. Keep temperatures below 26°C to prevent premature bolting.
Spinach is a nutritional powerhouse that also happens to be genuinely well-suited to indoor hydroponic growing and specifically to apartment setups where grow light intensity is modest. Unlike fruiting crops that need high PPFD (photosynthetic photon flux density) readings to perform, spinach grows respectably under lower light levels. That makes it excellent for entry-level LED setups.
Best Spinach Varieties for Hydroponics
| Variety | Bolt Resistance | Leaf Type | Best For |
|---|---|---|---|
| Tyee | High | Smooth | Warm environments; Singapore |
| Bloomsdale | Moderate | Savoy (crinkled) | Flavour; cool conditions |
| Space | High | Smooth, compact | Small setups; indoor growing |
| Warrigal Greens | Very High | Textured | Australian native alternative |
Best system: DWC or NFT
Beginner warning, bolting in heat: Spinach is a cool-season crop that bolts (sends up a flower stalk) when temperatures consistently exceed 26–27°C. Once it bolts, it stops producing edible leaves and the plant is effectively done. For Singapore growers, this means spinach almost certainly requires air-conditioning in your grow space to be viable.
Expert insight: Spinach is sensitive to manganese toxicity, which can occur when pH drops below 6.0. Low pH causes manganese to become over-available in solution, leading to brown spots on leaves that beginners often mistake for disease. Keeping pH at 6.0–7.0 and monitoring regularly prevents this entirely.
Beginner tip: Harvest the outermost leaves first and leave the central growing tip intact. A single plant managed this way can deliver three to four successive harvests over six to eight weeks before it needs replacing.
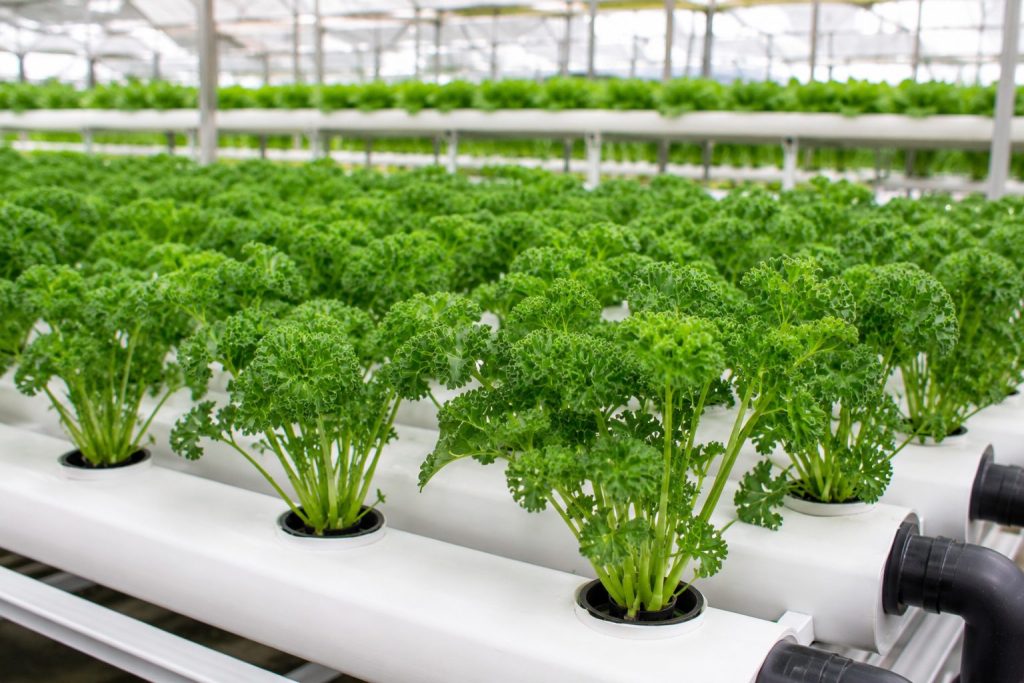
5. Kale — Slow to Start, Prolific Once Established
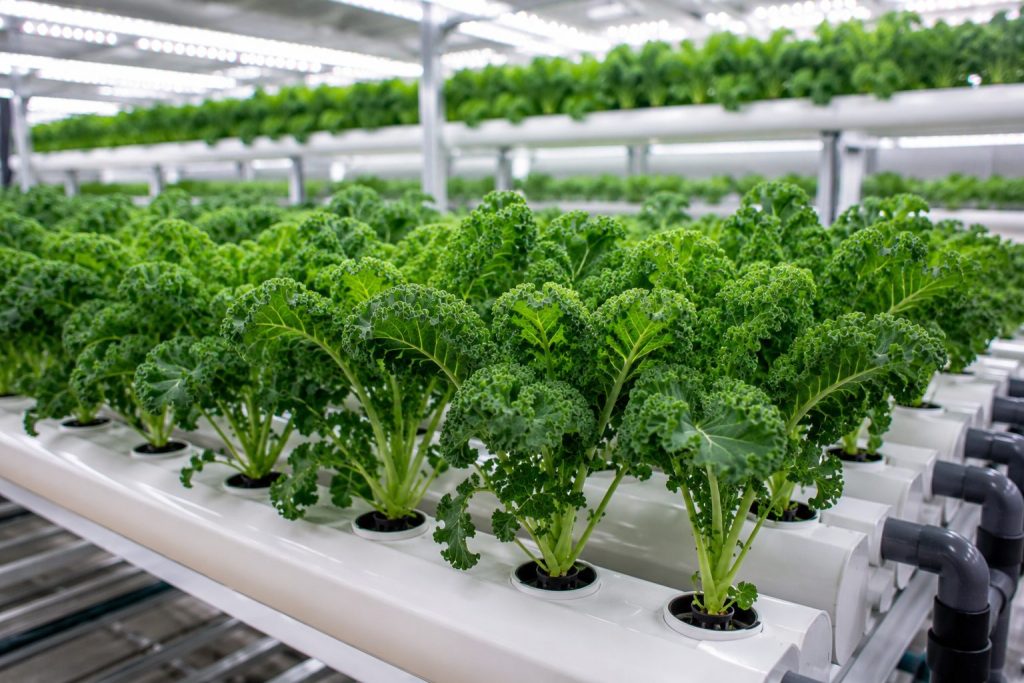
Difficulty: Easy | Growth Time: 40–60 days | Light: 12–16 hours/day | Ideal pH: 5.5–6.5
Kale takes 40–60 days to reach first harvest but remains productive for three to four months in a DWC system. It needs 14–16 hours of full-spectrum LED light daily more than lettuce or herbs. The outer-leaf harvest method extends production significantly. Hydroponically grown kale has a milder, less bitter flavour than store-bought varieties.
Kale takes noticeably longer than lettuce or herbs to reach a harvestable size, but it rewards patience with extraordinary productivity. Once a kale plant is established in a DWC or NFT system, it becomes one of the most consistently productive plants you can maintain. A single well-managed plant can provide harvests for months.
Kale Variety Comparison for Hydroponics
| Variety | Flavour | Leaf Texture | Growth Rate | Best Use |
|---|---|---|---|---|
| Lacinato (Tuscan) | Mild, nutty | Flat, dark | Moderate | Cooking, pasta, soups |
| Curly Kale | Robust, earthy | Ruffled | Fast | Salads, chips, smoothies |
| Red Russian | Tender, slightly sweet | Flat, frilled edges | Moderate | Raw salads, light cooking |
Best system: DWC or NFT
Beginner warning, light requirements: Kale needs significantly more light than lettuce or most herbs. Growing kale under the same modest LED used for lettuce results in pale, thin, elongated leaves that lack the flavour and texture of properly grown kale. Aim for at least 14–16 hours of light from a quality full-spectrum LED. If your setup can’t provide this, start with spinach or arugula instead.
Expert insight: Kale’s flavour actually improves after exposure to cold a phenomenon caused by the plant converting starches to sugars as a frost response. Indoors, you can partially replicate this by dropping your grow space temperature to around 15–18°C for a few days before harvest. Experienced growers use this to produce noticeably better-tasting kale.
Beginner tip: Don’t try to harvest the whole plant at once. Strip outer leaves regularly from the bottom up, leaving the central growing bud untouched. Kale managed this way can stay productive for three to four months in a good DWC setup.
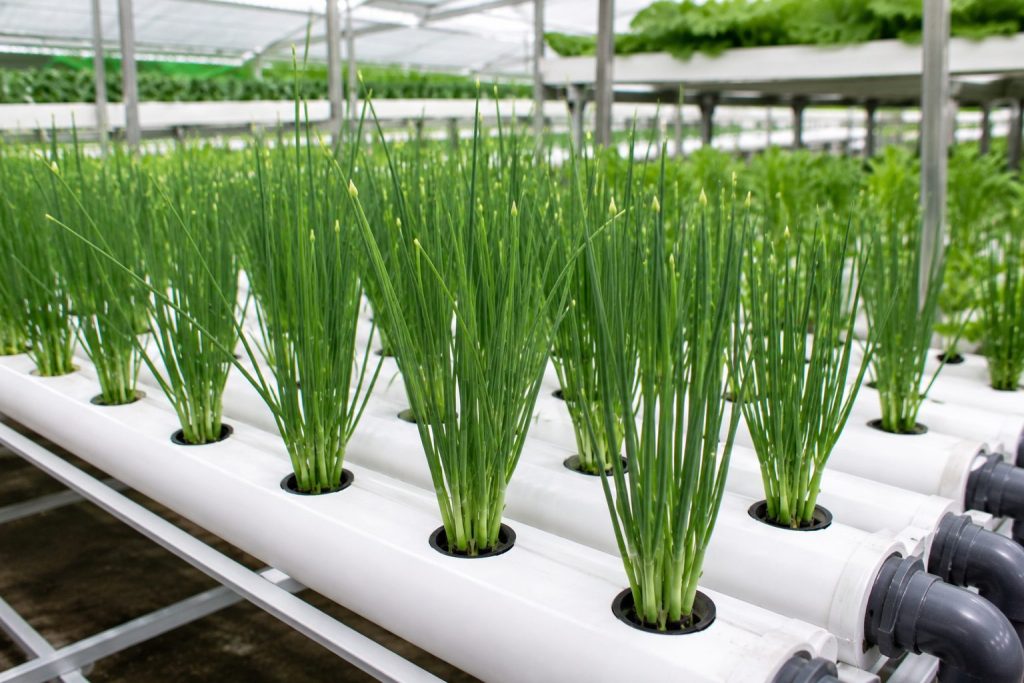
6. Green Onions (Scallions) — The Fastest Return You’ll Get
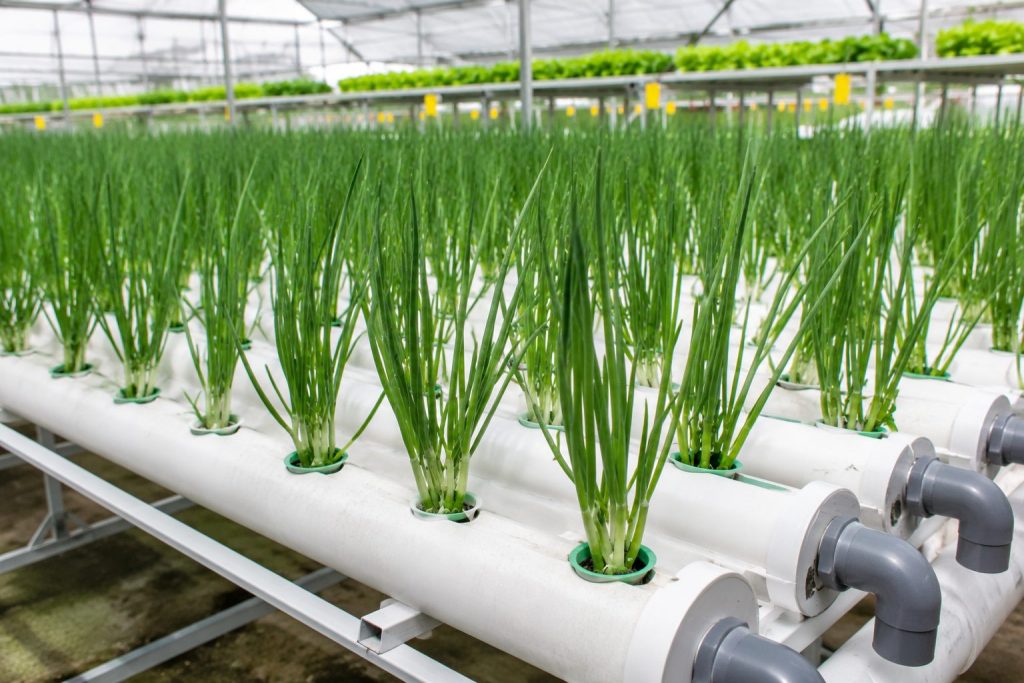
Difficulty: Very Easy | Growth Time: 21–30 days | Light: 12–14 hours/day | Ideal pH: 6.0–7.0
Green onions are the fastest hydroponic crop for beginners, producing results in 21–30 days from seed. They can also be regrown from store-bought scallion root ends placed directly in a Kratky jar the fastest possible entry into hydroponic growing. Give each root end 3–4 cm of lateral space to prevent crowding and fungal issues.
If you want to see results in under a month sometimes in as little as two weeks green onions are the answer. They’re arguably the fastest crop you can grow hydroponically, and they carry an additional practical advantage: you can regrow them directly from the root ends of store-bought scallions. Place the root ends in a Kratky jar with nutrient solution, and you have a fully functional growing operation within minutes.
How to Regrow Green Onions Hydroponically in 4 Steps
- Cut store-bought scallions 3–4 cm above the root ends and use the tops in cooking
- Place root ends in a clean Kratky jar or glass filled with pH-adjusted nutrient solution (EC 1.2, pH 6.5)
- Position in a spot with 12+ hours of light daily (grow light or bright windowsill)
- Harvest new growth by snipping above the white base the plant will regrow repeatedly
Best system: Kratky or DWC. A simple mason jar works.
Beginner warning, crowding: Many beginners pack too many scallion roots into a single container. Even though they’re slim plants, overcrowding restricts airflow and light penetration at the base, leading to poor growth and increased risk of fungal issues. Give each root end at least 3–4 cm of lateral space.
Singapore-specific observation: Green onions (known locally as daun bawang) are used daily in Singaporean cooking in fried rice, soups, noodle dishes, and as garnishes. A bunch at the supermarket costs around $0.80–$1.20 SGD and wilts within a few days. A living Kratky setup produces continuously for weeks at negligible cost.
Beginner tip: Keep a dedicated jar of regrowing scallion roots on your kitchen windowsill as a permanent fixture while your main setup handles other crops. It requires almost no attention and means you’ll never run out of green onions again.
7. Chives — Underrated, Reliable, and Surprisingly Adaptable
Difficulty: Very Easy | Growth Time: 30 days | Light: 12–14 hours/day | Ideal pH: 6.0–7.0
Chives are one of the most reliable and low-maintenance herbs for indoor hydroponics. They tolerate lower light levels than almost any other herb, making them ideal for less-bright areas of your grow setup. They reach harvest in around 30 days and can be cut back hard repeatedly, regrowing fully each time.
Chives don’t get the attention they deserve in beginner hydroponic circles. They’re often overlooked in favour of flashier herbs like basil, but in terms of sheer reliability and low-maintenance production, chives are exceptional. They handle a wider range of indoor conditions than most herbs, grow steadily without demanding constant attention, and pair well with virtually every savoury dish.
Best system: Any system DWC, Kratky, NFT, or even a windowsill setup with adequate light
Beginner warning, flowering: Like basil, letting chives flower significantly degrades flavour. The flowers themselves are edible and quite beautiful (purple pompom clusters), but once the plant puts energy into flowering, the leaves become tougher and less flavourful. Snip flowers off promptly, or use the blossoms as a garnish.
Expert insight: Chives can be grown from seed or divided from an existing clump. Division is faster if you buy a pot of chives from a supermarket or nursery, you can split the clump into several sections and establish each one in a separate net pot. Each division will be productive much faster than seed-grown chives.
Beginner tip: Chives can be cut back to within 3–4 cm of the net pot and will regrow fully in a few weeks. This “hard harvest” actually rejuvenates the plant and can be done repeatedly without harming it.
8. Parsley — Worth the Wait, But Test Your Patience First
Difficulty: Moderate | Growth Time: 35–45 days (after germination) | Light: 12–14 hours/day | Ideal pH: 5.5–6.0
Parsley is rated moderate difficulty primarily because of its slow germination seeds take 14–21 days to sprout. Soaking seeds in room-temperature water for 24–48 hours before planting reduces germination time by 30–40% by washing away a water-soluble inhibitor in the seed coat. Once established, parsley grows steadily and produces for months.
Parsley is rated moderate not because it’s difficult to grow once established, but because it’s notoriously slow to germinate. Seeds can take anywhere from 14–21 days just to sprout, which can lead beginners to assume something has gone wrong when in fact the seeds are simply doing what parsley seeds do: taking their time.
Flat-Leaf vs Curly Parsley: Which Is Better for Hydroponics?
| Feature | Flat-Leaf (Italian) | Curly Parsley |
|---|---|---|
| Flavour | Stronger, more complex | Milder, more subtle |
| Best use | Cooking, sauces, tabbouleh | Garnishing, decoration |
| Growth rate | Slightly faster | Slightly slower |
| Leaf texture | Smooth, flat | Ruffled, curly |
| Recommended for | Most growers | Decorative setups |
Best system: DWC or NFT
Beginner warning, germination impatience: The most common reason beginners think parsley has failed is simply impatience. Parsley seeds germinate most reliably at 18–24°C. Higher temperatures actually inhibit germination. In warm grow spaces (common in Singapore), germinate parsley in a cooler location first an air-conditioned room at ambient temperature works well.
Expert insight: Soaking parsley seeds in room-temperature water for 24–48 hours before planting genuinely helps. Parsley seeds contain a water-soluble germination inhibitor in their seed coat soaking washes it away and can cut germination time by 30–40%. This is well-established horticultural practice, not a home remedy.
Beginner tip: Start parsley seeds in a rockwool cube or coco coir plug before transferring to your main system. This gives you a controlled germination environment and means you’re only adding established seedlings to your reservoir reducing the risk of issues during the slow early stage.
9. Cilantro — Invaluable in the Kitchen, Demanding About Conditions
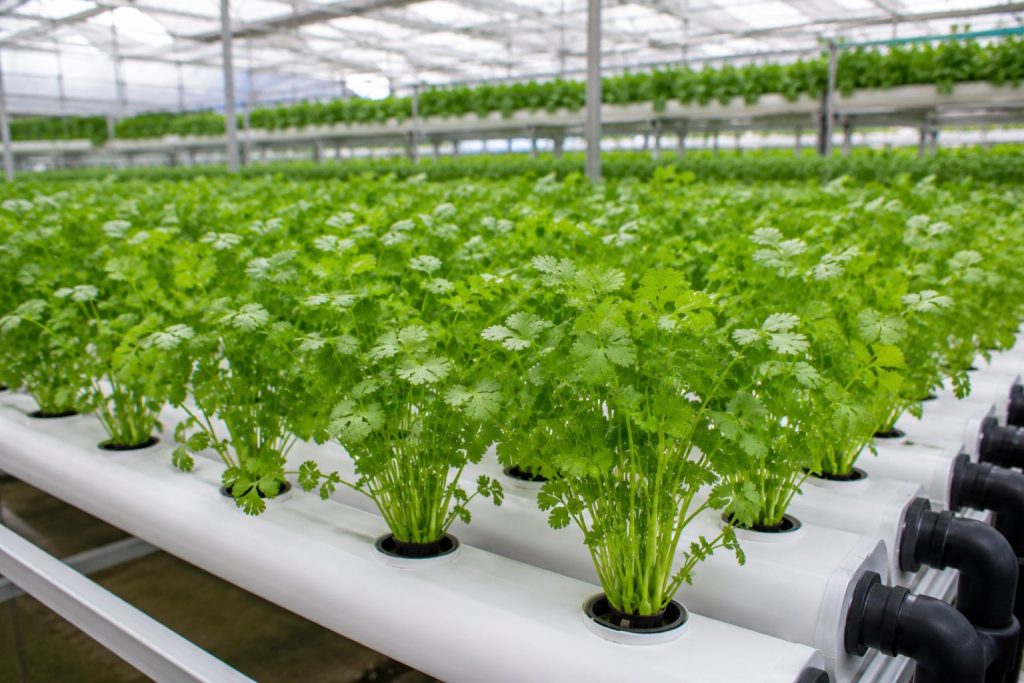
Difficulty: Moderate | Growth Time: 21–28 days to first harvest | Light: 12–14 hours/day | Ideal pH: 6.2–6.8
Cilantro (coriander) is a fast-growing hydroponic herb ready in 21–28 days, but bolts rapidly when temperatures exceed 26–27°C. For Singapore growers, bolt-resistant varieties like ‘Leisure’ or ‘Slow Bolt’ and succession planting every 2–3 weeks are essential strategies. Australian growers in Melbourne and Sydney get best results March–August.
Cilantro is one of the most-used herbs in Southeast Asian, South Asian, and Australian cooking. Fresh coriander wilts within 24–48 hours of purchase at supermarkets, which makes a living hydroponic source genuinely appealing if you can manage its bolting tendency.
Cilantro Succession Planting Schedule for Continuous Harvest
Why succession plant? Cilantro’s productive window is short 3–5 weeks before bolting. Staggering plantings every 2–3 weeks ensures continuous supply.
| Week | Action |
|---|---|
| Week 1 | Start Batch 1 seeds in rockwool or coco plugs |
| Week 3 | Start Batch 2 seeds; transplant Batch 1 to main system |
| Week 5 | Start Batch 3; harvest Batch 1 outer leaves; transplant Batch 2 |
| Week 7 | Start Batch 4; harvest Batch 2; Batch 1 nearing end of productive life |
| Week 9 | Remove Batch 1; continue rotation |
Best system: Kratky or DWC
Beginner warning, bolting in warm rooms: At ambient temperatures above 26–27°C, cilantro pushes to flower quickly, producing sparse lacy leaves rather than the flat broad leaves you want for cooking. This isn’t a system failure it’s the plant responding exactly as it’s programmed to do. Temperature control or bolt-resistant varieties are the solution.
Singapore-specific observation: Bolt-resistant varieties ‘Leisure’ and ‘Slow Bolt’ won’t eliminate bolting entirely in Singapore’s heat, but they significantly extend the productive window. Combined with succession planting, they’re the most practical approach for local growers.
Expert insight: Cilantro is one of the few herbs where succession planting isn’t optional it’s the strategy. A continuous rotation of young plants provides far more reliable supply than trying to manage one or two plants long-term, especially in warm growing conditions.
Beginner tip: Harvest cilantro by snipping stems from the outside, never pulling the whole plant. Once thin, feathery upper leaves appear (a pre-bolting signal), harvest aggressively and start new seedlings immediately.
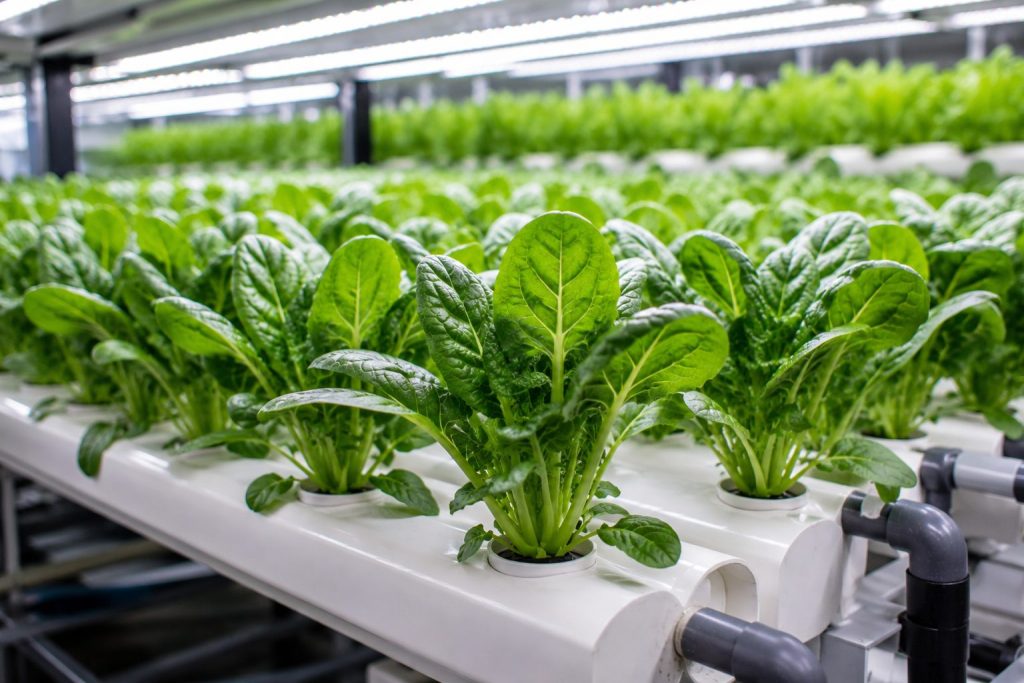
10. Bok Choy — A Tropical Favourite That Was Made for Hydroponics
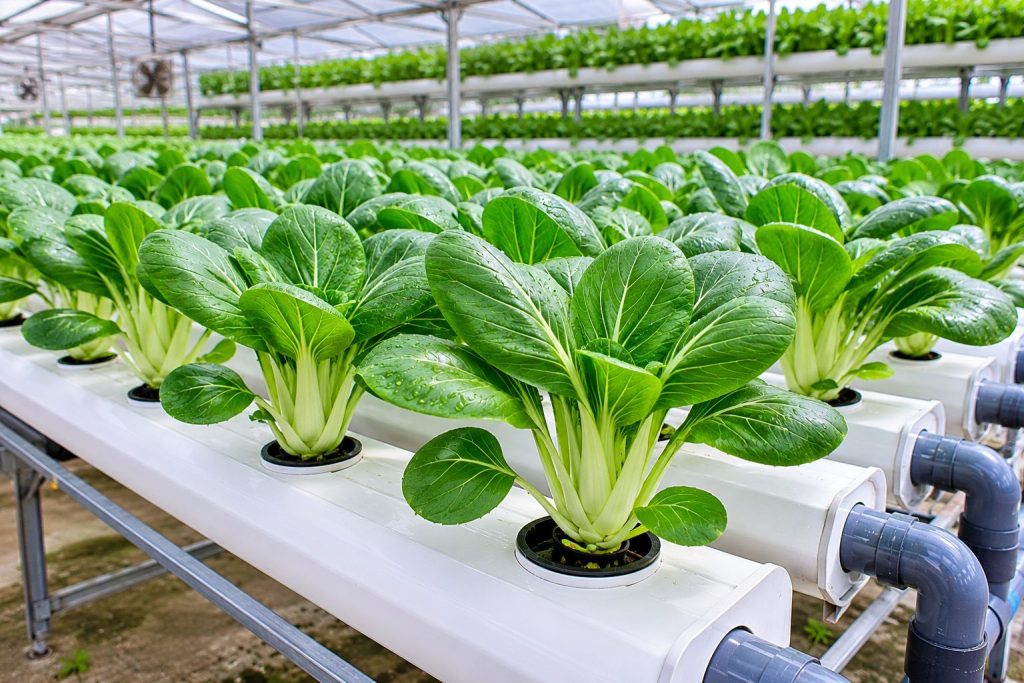
Difficulty: Easy | Growth Time: 30–45 days | Light: 12–14 hours/day | Ideal pH: 6.0–7.0
Bok choy is one of the best hydroponic vegetables for Singapore and Southeast Asian apartment growers. Baby Bok Choy varieties are harvestable in as little as 25–30 days, grow well in DWC or NFT systems, and should be harvested whole when young and tender not cut-and-come-again like lettuce.
Bok choy might be the most underrated plant on this list for growers in Singapore and Southeast Asia. It responds exceptionally well to hydroponic growing, and hydroponic results noticeably outperform soil growing in terms of speed and consistency.
Bok Choy Varieties Compared
| Variety | Harvest Time | Size | Flavour | Best For |
|---|---|---|---|---|
| Baby Bok Choy | 25–30 days | Very small | Mild, tender | Stir-fries, soups |
| Shanghai Bok Choy | 35–40 days | Small–medium | Mild, crisp | All cooking methods |
| Pak Choi | 40–45 days | Medium–large | Slightly stronger | Braising, steaming |
Best system: DWC or NFT
Beginner warning — timing the harvest: Many beginners wait too long to harvest bok choy. Unlike lettuce or herbs, bok choy doesn’t benefit from extended cut-and-come-again harvesting it’s best taken whole when young and tender. Leave it too long and the stalks become fibrous and the flavour sharpens unpleasantly. If you see rapid elongation in the centre, harvest immediately.
Singapore-specific observation: Growing your own bok choy gives you both pesticide-free produce and the option to harvest baby varieties at the exact size and tenderness you prefer something that isn’t available at most wet markets or supermarkets.
Beginner tip: Try baby bok choy first. The smaller size means faster turnaround, more learning cycles, and results that are genuinely impressive for a beginner.
11. Arugula — Peppery, Lightning-Fast, and Almost Foolproof
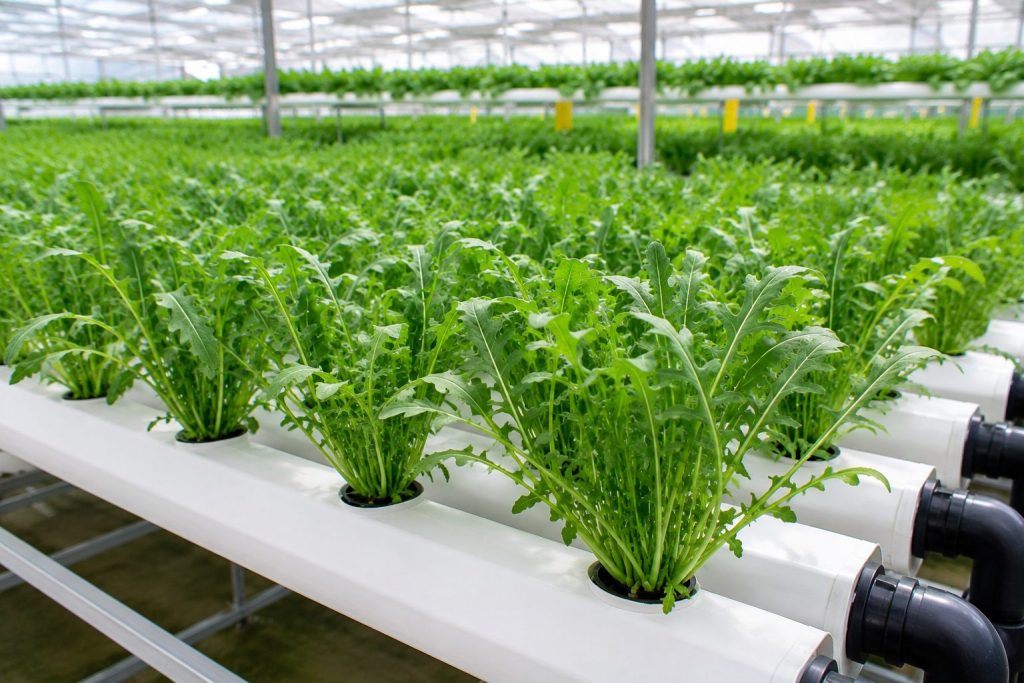
Difficulty: Very Easy | Growth Time: 21–30 days | Light: 10–14 hours/day | Ideal pH: 6.0–7.0
Arugula (rocket) is one of the fastest and easiest hydroponic crops, germinating in 3–5 days and reaching harvest in 21–30 days. It tolerates lower light levels than almost any other crop on this list. Arugula seeds are naturally mucilaginous the gel coat that appears when wet is normal, not mould, and actually aids germination.
Arugula germinates within 3–5 days of planting, grows visibly fast, and can handle lower light levels than nearly anything else on this list. For apartment growers with modest lighting setups, arugula is genuinely forgiving.
Two Ways to Harvest Arugula Hydroponically
Method 1: Microgreens harvest
- Sow seeds densely across a growing tray
- Harvest the entire crop at 10–14 days old (5–8 cm tall)
- Cut just above the growing media; do not try to regrow
- Fastest possible turnaround; very mild flavour
Method 2: Full-size leaf harvest (cut-and-come-again)
- Sow seeds or thin to individual plants with 5–7 cm spacing
- Begin harvesting outer leaves at 21–28 days
- Leave the central growing tip intact
- Plants produce for 6–8 weeks before quality declines
Best system: Kratky or DWC
Beginner warning — heat and bitterness: In rooms consistently above 25°C, arugula develops an extremely sharp, almost bitter bite. If your grow space runs warm, harvest plants young and small to moderate this effect.
Australia-specific observation: For Australian apartment growers, arugula is a natural autumn and winter crop. Sydney, Melbourne, and Canberra growers find it performs particularly well between April and September. In Queensland or the Northern Territory, temperature control is required year-round.
Expert insight: The gel coat that appears on arugula seeds when wet is mucilage a natural property of the seed that aids germination. It appears immediately upon wetting and is clear. True mould appears as fuzzy growth after several days. Don’t mistake the two.
Beginner tip: Arugula grown under lower light tends to be milder and less peppery than high-light arugula. If you find the flavour too sharp, reduce light intensity slightly or harvest earlier this is one of the few crops where less light can actually improve the eating experience.
12. Swiss Chard — Colourful, Remarkably Hardy, and Long-Lasting
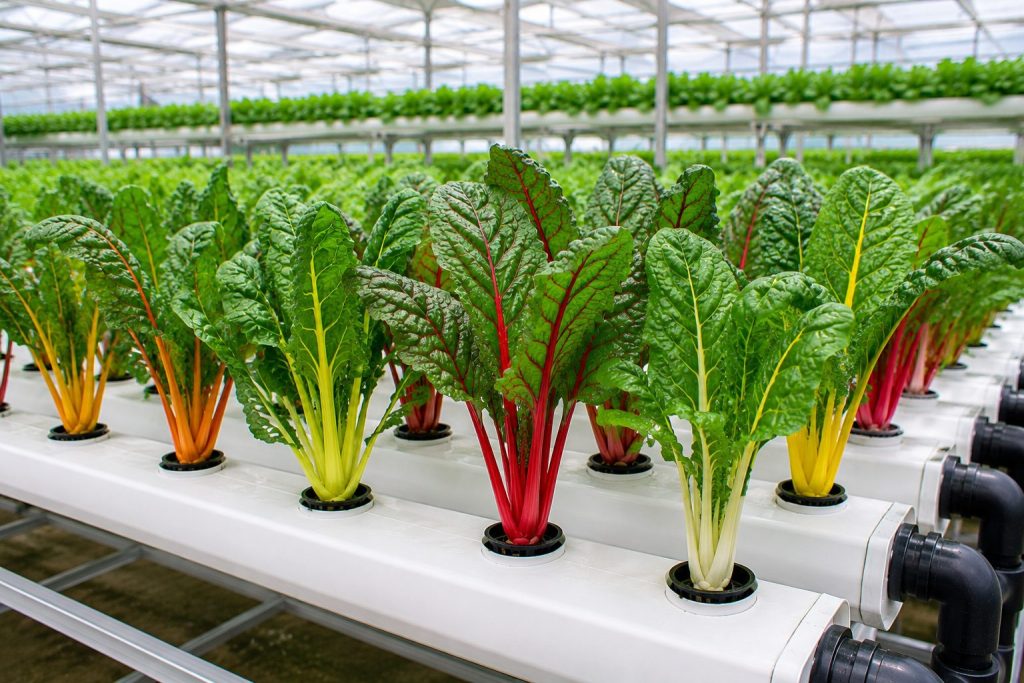
Difficulty: Easy | Growth Time: 35–50 days | Light: 12–16 hours/day | Ideal pH: 6.0–7.0
Swiss Chard is a highly productive leafy green that stays harvest-ready for three to five months in a DWC system using the outer-leaf harvest method. Rainbow varieties are particularly ornamental. Swiss chard is a heavier feeder than lettuce and specifically demands adequate calcium and magnesium a Cal-Mag supplement prevents the most common deficiency symptoms.
Swiss chard is as beautiful as it is practical. The Rainbow Chard variety with stems in red, yellow, orange, pink, and white looks genuinely stunning in a hydroponic setup. Beyond aesthetics, it’s one of the most forgiving heavy feeders on this list.
Swiss Chard Varieties for Hydroponics
| Variety | Stem Colour | Ornamental Value | Flavour | Growth Rate |
|---|---|---|---|---|
| Rainbow / Bright Lights | Multi-coloured | Very high | Mild | Moderate |
| Ruby Red | Deep red | High | Earthy | Moderate |
| Fordhook Giant | White/cream | Low | Traditional | Fast |
Best system: DWC or NFT
Beginner warning — calcium and magnesium needs: Swiss chard is a heavier feeder than most leafy greens and particularly demands calcium and magnesium. If you see yellowing between leaf veins (interveinal chlorosis), it’s almost always a magnesium deficiency. Adding a Cal-Mag supplement to your reservoir is a straightforward fix.
Expert insight: The vibrant colours in rainbow chard stems are produced by betalain pigments the same compounds that give beetroot its colour. These pigments are most vivid under bright light and slightly cooler temperatures. Push your light intensity up and lower room temperatures slightly as plants mature to maximise colour intensity.
Beginner tip: Harvest outer leaves repeatedly, cutting them at the base of the stem. Leave the central growing tip completely untouched. Chard managed this way can stay productive for three to five months far longer than any herb or lettuce plant.
13. Strawberries — A Genuine Milestone Crop
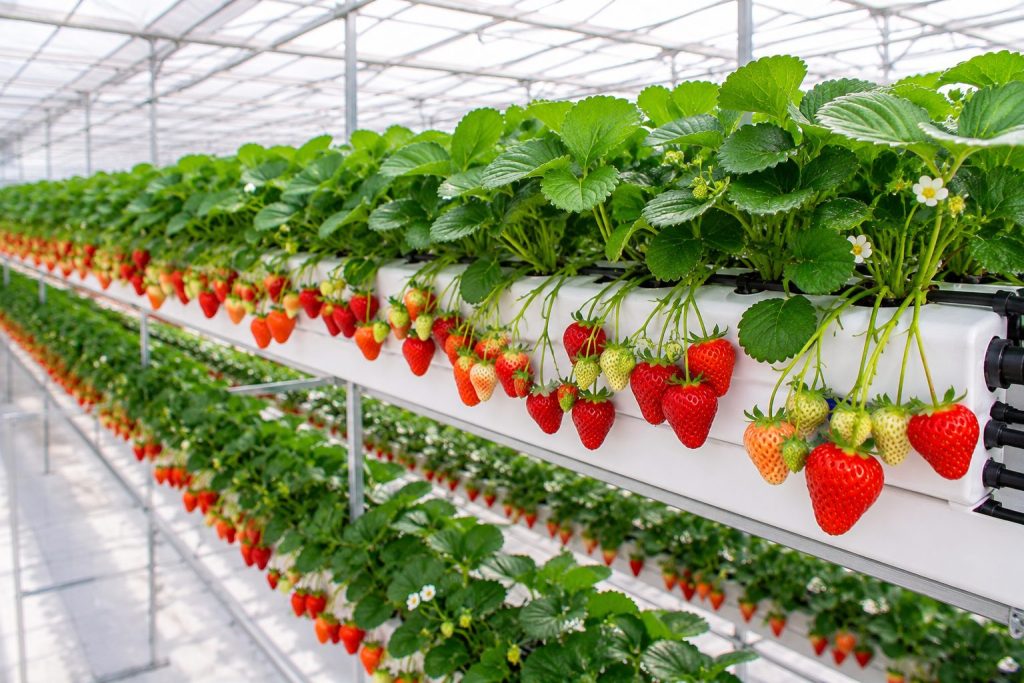
Difficulty: Moderate | Growth Time: 60–90 days | Light: 14–16 hours/day | Ideal pH: 5.5–6.5
Hydroponic strawberries take 60–90 days to first fruit and require manual pollination indoors bees don’t come to apartments. Use a soft paintbrush or cotton swab to transfer pollen between open flowers. Always choose everbearing varieties like Albion or Seascape for indoor growing; June-bearing varieties produce only once per year and don’t suit controlled indoor environments.
Here’s where things get more exciting. Strawberries take considerably more time and attention than herbs or leafy greens, but the payoff is a different category of reward.
How to Pollinate Strawberries Indoors: Step-by-Step
- Wait until strawberry flowers are fully open (white petals, yellow centre visible)
- Use a clean, dry, soft-bristled paintbrush or cotton swab
- Gently swirl the brush around the centre of one flower to collect pollen
- Transfer pollen to the centre of a different open flower on the same or another plant
- Repeat for every open flower every 1–2 days during flowering
- Well-pollinated fruit will begin to swell and colour within 3–4 weeks
Everbearing vs June-Bearing Strawberries for Hydroponics
| Feature | Everbearing | June-Bearing |
|---|---|---|
| Fruiting pattern | Continuous throughout year | One large crop per year |
| Indoor suitability | Excellent | Poor |
| Recommended varieties | Albion, Seascape, Quinault | Not recommended indoors |
| Setup complexity | Moderate | Not practical for apartments |
Best system: DWC or Aeroponics (aeroponics provides better oxygenation for strawberry roots and can accelerate fruit development)
Beginner warning — pollination: The most common reason hydroponic strawberry plants flower beautifully but never produce fruit is failed or absent pollination. Manual pollination takes 30 seconds per plant and is non-negotiable for indoor growing.
Expert insight: Strawberries are sensitive to sodium accumulation in the root zone. If you’re using tap water with high mineral content (common in Singapore and many Australian cities), use filtered or RO (reverse osmosis) water for your reservoir. This prevents salt buildup that progressively reduces fruit quality and yield over time.
Beginner tip: Start with runners or crowns rather than seeds. Seeds take months longer and results are unpredictable. Get your nutrient management dialled in on simpler crops before attempting strawberries.
14. Cherry Tomatoes — The Ultimate Apartment Grower’s Achievement
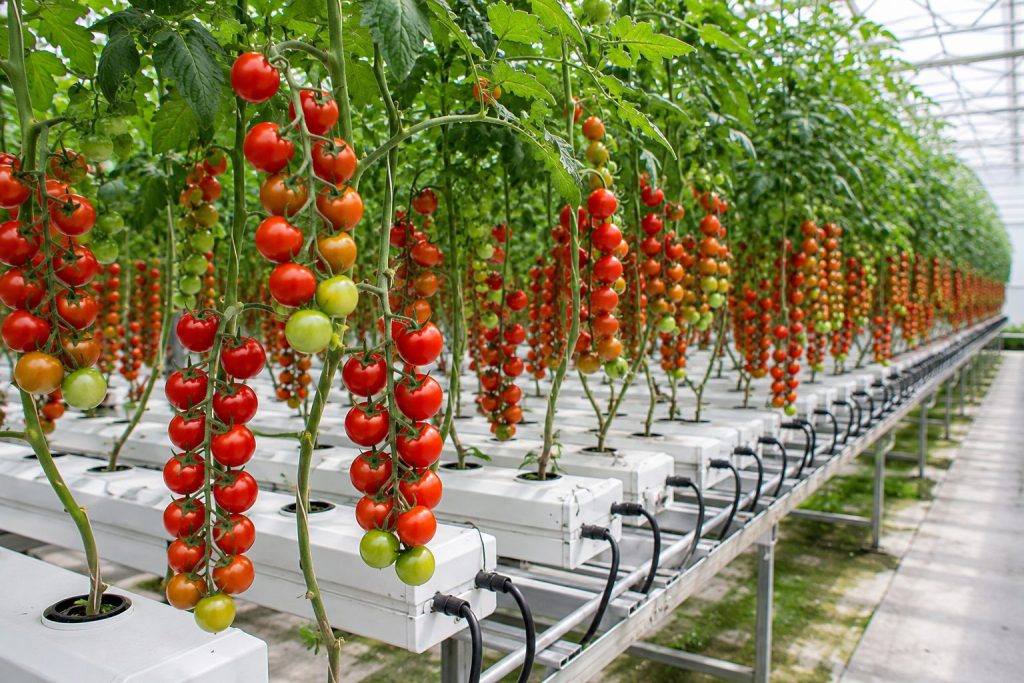
Difficulty: Challenging | Growth Time: 60–80 days to first harvest | Light: 16–18 hours/day | Ideal pH: 5.5–6.5
Cherry tomatoes are the most popular advanced hydroponic crop for apartment growers. They require 16–18 hours of high-intensity LED light, manual pollination indoors, physical staking support, and different EC nutrient levels across three growth stages: 1.5–2.0 (seedling), 2.0–2.5 (vegetative), and 2.5–3.5 (flowering and fruiting).
Cherry tomatoes are probably the most popular hydroponic plant beyond herbs and greens, and the ambition makes sense. There is something distinctly satisfying about picking a ripe tomato from a plant you grew indoors, under lights, in an apartment.
Cherry Tomato Varieties for Indoor Hydroponic Growing
| Variety | Plant Size | Growth Type | Flavour | Best For |
|---|---|---|---|---|
| Tiny Tim | Very compact (30–45 cm) | Determinate | Sweet | Small apartments, first-timers |
| Tumbling Tom | Trailing | Determinate | Balanced | Vertical/hanging setups |
| Sungold | Medium–large | Indeterminate | Exceptional, sweet | Growers with strong LEDs |
| Sweet Million | Medium | Indeterminate | Classic tomato | High-yield setups |
EC Management for Cherry Tomatoes by Growth Stage
| Growth Stage | Recommended EC | Notes |
|---|---|---|
| Seedling (weeks 1–3) | 1.5–2.0 | Low concentration; roots still developing |
| Vegetative (weeks 4–6) | 2.0–2.5 | Increase gradually as plant grows |
| Flowering & Fruiting (week 7+) | 2.5–3.5 | Higher concentration supports fruit development |
Best system: DWC or Ebb & Flow
Beginner warning — light is the critical variable: 16–18 hours of high-intensity LED light is not a suggestion it’s a requirement for flowering and fruit set. Underpowered setups produce tall, spindly plants with few or no fruits, which is deeply demoralising after two months of waiting. Honestly assess your lighting before starting tomatoes.
Expert insight: Tomatoes require different EC levels at different growth stages. Many beginners use a single fixed nutrient concentration for the entire grow cycle and wonder why yields are disappointing. Adjusting EC as the plant develops is genuinely important for tomatoes in a way it simply isn’t for lettuce or herbs.
Apartment-specific advice: Plan for vertical space. Even compact varieties like Tiny Tim can reach 60–90 cm. Use bamboo stakes or a simple trellis system and tie the main stem regularly.
Beginner tip: Don’t attempt cherry tomatoes as your first crop. Grow two or three cycles of lettuce and herbs first. By the time you switch to tomatoes, you’ll understand your system’s pH drift, how your lights affect plant behaviour, and how to read your plants’ signals all of which significantly improve your chances of success.
15. Peppers — Patience Rewarded With Exceptional Results
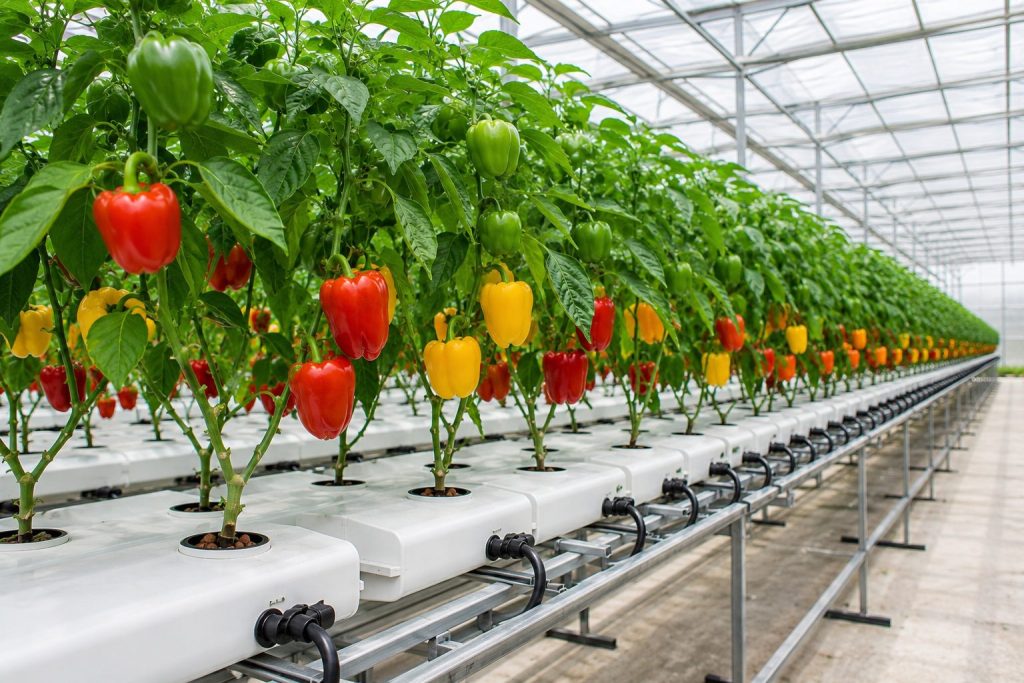
Difficulty: Challenging | Growth Time: 70–90 days | Light: 16–18 hours/day | Ideal pH: 5.5–6.5
Peppers are the longest-growing crop on this list at 70–90 days from transplant to first harvest, with germination alone taking 10–21 days. They need 16–18 hours of high-intensity LED light and manual pollination a gentle daily shake of the plant stem when flowers are open is usually sufficient. For Singapore growers, Bird’s Eye Chilli (chili padi) is heat-tolerant and highly practical.
Peppers are slow. They need intense light, careful nutrition management, and more weeks of patience than most beginners expect. But for growers in Singapore especially, the reward a continuously producing indoor chilli plant has a practical value that goes well beyond novelty.
Best Pepper Varieties for Indoor Hydroponic Growing
| Variety | Heat Level | Plant Size | Harvest Time | Best For |
|---|---|---|---|---|
| Bird’s Eye Chilli (Chili Padi) | Very Hot | Compact | 70–80 days | Singapore cooking; tropical climates |
| Thai Chilli | Hot | Compact | 70–80 days | Southeast Asian dishes |
| Jalapeño | Medium | Compact–medium | 75–85 days | Versatile; widely useful |
| Mini Bell Pepper | Mild/None | Compact | 80–90 days | Decorative; family-friendly |
Best system: DWC or Ebb & Flow
Beginner warning — the waiting game: Peppers are much slower than any other plant on this list. Many beginners start peppers, don’t see results quickly enough, assume something is wrong, and intervene in ways that actually set the plant back. Peppers need time not intervention. Resist the urge to change things.
Expert insight: Peppers require manual pollination indoors. Unlike tomatoes, pepper flowers are typically self-fertile and pollen transfers easily. A gentle daily shake of the plant stem when flowers are open is often sufficient the vibration mimics wind pollination. A small oscillating fan running near the plant serves the same purpose and also improves stem strength.
Singapore-specific observation: Bird’s Eye Chilli is more heat-tolerant than many other chilli varieties and handles Singapore’s warm ambient temperatures reasonably well indoors. It’s one of the few crops where Singapore’s climate isn’t working against you which makes it an excellent choice for local growers.
Beginner tip: Treat peppers as a graduate-level project. Master your nutrient management and light schedule on simpler crops first. When you’re confident in your system, peppers are a deeply satisfying next step.
Best Plants for Small Apartments
The best hydroponic plants for small apartments are lettuce, basil, mint, and green onions. These four crops produce continuous harvests in compact setups, require no trellising or staking, and thrive in space-efficient Kratky or countertop DWC systems. Vertical tower systems can triple growing capacity without increasing floor footprint.
For most apartment growers, the real constraint isn’t budget or knowledge it’s space. If you’re working with a single shelf, a kitchen counter, or one corner of a room, these four crops give you the best return per square centimetre.
Top 4 Hydroponic Crops for Apartment Growing
| Crop | Space Required | System Needed | Noise Level | Harvest Frequency |
|---|---|---|---|---|
| Lettuce | Very small | Kratky or NFT | Silent (Kratky) | Every 1–2 weeks |
| Basil | Very small | Kratky or DWC | Silent/low hum | Every 10–14 days |
| Mint | Small | Any | Silent (Kratky) | Every 2–3 weeks |
| Green Onions | Minimal | Kratky jar | Silent | Every 2–3 weeks |
Lettuce is the obvious first choice. A few Kratky jars or a small NFT channel takes up almost no counter space and delivers continuous harvests. You can stack multiple Kratky jars vertically to dramatically increase your yield without increasing your footprint.
Basil is exceptionally compact and productive. A single 3-inch net pot can supply a two-person household with fresh basil for weeks on end.
Mint can be kept contained in individual net pots unlike in soil where it spreads aggressively. One or two pots positioned on a kitchen shelf is a practical and productive setup that requires almost no maintenance.
Green onions are arguably the most space-efficient crop in hydroponics. A cluster of regrowing scallion roots in a tall Kratky jar takes up less than 15 cm of counter space and produces continuously for weeks.
Practical Apartment Tips for Hydroponic Growers
- Think vertically. Tower systems, stacked NFT channels, and purpose-built countertop systems dramatically increase growing capacity without expanding your footprint.
- Consider noise. DWC air pumps produce a low hum or bubbling sound. In a studio apartment or bedroom, this can become irritating. Kratky systems are completely silent.
- Manage humidity. Hydroponic systems raise ambient moisture levels slightly in enclosed spaces. A small fan and adequate ventilation prevent condensation and mould on surrounding surfaces.
- Choose countertop systems strategically. All-in-one smart grow systems (AeroGarden, iDOO, Click & Grow Smart Garden) are particularly well-suited to apartments they’re self-contained, quiet, and require minimal setup.
Best Plants for Singapore’s Climate
The best hydroponic plants for Singapore’s tropical climate are Thai Basil, Holy Basil, Baby Bok Choy, Bird’s Eye Chilli, Green Onions, and Kangkong. These crops are heat-tolerant and suited to Singapore’s 25–33°C year-round temperatures. Lettuce and spinach are viable but require air-conditioning and specific heat-tolerant varieties to prevent bolting.
Growing hydroponically in Singapore presents a specific set of conditions that differ meaningfully from temperate climates. Singapore’s year-round temperatures (typically 25–33°C ambient) are excellent for some crops and genuinely challenging for others. Humidity averages 70–80%, which creates root zone risks and leaf surface risks if airflow is inadequate.
Singapore Hydroponic Plant Guide: Heat Tolerance Overview
| Plant | Heat Tolerance | Air-Con Needed? | Recommended Varieties |
|---|---|---|---|
| Thai / Holy Basil | High | No | Standard Thai, Kaphrao |
| Baby Bok Choy | High | No | Shanghai, Baby varieties |
| Bird’s Eye Chilli | High | No | Capsicum frutescens |
| Green Onions | High | No | Any standard variety |
| Vietnamese Mint | High | No | Daun kesum |
| Kangkong | Very High | No | Water spinach varieties |
| Lettuce | Low | Yes (above 30°C) | Jericho, Nevada |
| Spinach | Low | Yes | Tyee (most heat-tolerant) |
| Cilantro | Low | Recommended | Leisure, Slow Bolt |
| Mint (European) | Moderate | Helpful | Spearmint, Peppermint |
Expert insight for Singapore growers: The combination of heat and high humidity makes root rot and fungal issues more prevalent than in cooler climates. In DWC systems, reservoir temperatures can rise into the 28–30°C range warm water holds less dissolved oxygen and supports faster growth of pathogens like Pythium (root rot). Keep reservoirs away from direct sunlight, consider insulating them, and maintain reservoir temperatures below 22°C. Some Singapore growers add small aquarium chillers it sounds extreme, but it genuinely transforms the reliability of DWC systems in tropical conditions.
Humidity management: Run at least one small fan consistently near your grow setup. Good airflow prevents the stagnant conditions that encourage fungal issues on leaves and around net pot openings. This is especially important during Singapore’s rainy season when ambient humidity spikes above 85%.
Best Plants for Australian Apartment Growers
The best hydroponic plants for Australian apartment growers are lettuce, herbs (basil, mint, chives), arugula, and cherry tomatoes. These crops thrive indoors year-round under LED grow lights. In southern Australian cities (Melbourne, Hobart), winter is particularly good for cool-season crops; summer requires heat management in non-air-conditioned spaces.
Australia’s diverse climates mean the right approach to indoor hydroponics varies by city. But the common thread: indoor hydroponics removes seasonal constraints and makes fresh produce available year-round regardless of outdoor conditions.
Australian City-by-City Hydroponic Growing Guide
| City | Climate Challenge | Best Year-Round Crops | Seasonal Notes |
|---|---|---|---|
| Sydney | Summer heatwaves | Lettuce, herbs, bok choy | Heat management in Jan–Feb |
| Melbourne | Cool, variable winters | Spinach, kale, arugula | Basil needs warmth Nov–Mar |
| Brisbane | Warm, humid summers | Thai basil, bok choy, chillies | Cool-season crops need AC in summer |
| Perth | Extreme summer heat | Lettuce (AC), herbs | Strong AC needed Dec–Feb |
| Adelaide | Moderate, manageable | Most crops year-round | Easiest city for apartment hydroponics |
| Hobart | Cool, mild summers | Kale, spinach, arugula | Excellent cool-season growing; basil needs warmth |
Australian Seasonal Hydroponic Calendar
| Season | Months | Focus | What to Grow |
|---|---|---|---|
| Autumn | Mar–May | Ideal for cool-season crops | Arugula, spinach, kale, lettuce |
| Winter | Jun–Aug | Indoors valuable; use LEDs | Lettuce, kale, herbs, spinach |
| Spring | Sep–Nov | Transition period | Lettuce, basil, mint, bok choy |
| Summer | Dec–Feb | Heat management critical | Heat-tolerant lettuce, Thai basil, chillies |
Expert insight for Australian growers: Australian tap water quality varies significantly by city. Many areas have high TDS (Total Dissolved Solids) from source minerals, which affects your baseline EC reading. Invest in a basic TDS/EC meter (around $15–$25 AUD) and test your tap water before mixing nutrients. If your tap water reads above 0.3 EC, factor that into your calculations.
Plants Beginners Should Avoid
Beginners should avoid carrots, potatoes, large melons, corn, broccoli, and cauliflower in indoor hydroponic setups. These crops require either deep root zones incompatible with standard systems (root vegetables), enormous physical space (melons, corn), or produce a single harvest with poor space-to-yield ratios (broccoli, cauliflower).
Understanding what not to grow is just as important as knowing what to grow.
Why These Plants Fail in Beginner Hydroponic Setups
| Plant | Core Problem | Why It Matters |
|---|---|---|
| Carrots | Needs deep taproot development | DWC/NFT/Kratky can’t accommodate this |
| Potatoes | Tubers form underground in physical medium | No standard system supports tuber formation |
| Large Melons | Vines extend 3–4 metres; fruit needs heavy trellising | Physically impossible in an apartment |
| Corn | Wind-pollinated; 1.5–2 m tall; 1–2 ears per plant | Terrible space-to-yield ratio; pollination impractical |
| Broccoli | 60–90 days; one head per plant; high light needs | Poor return on time and space |
| Cauliflower | Same issues as broccoli; more temperature-sensitive | Even worse space-to-yield ratio |
The common thread through all of these: they’re designed by evolution and agriculture for soil-based, outdoor conditions. Their biological requirements deep root zones, physical growing medium, wind pollination, or enormous physical size make them incompatible with what a beginner’s indoor hydroponic system can realistically provide.
What is the easiest hydroponic plant for beginners?
Lettuce is the easiest hydroponic plant for beginners. It grows from seed to harvest in 30–45 days, needs minimal nutrients (EC 0.8–1.2), tolerates minor pH fluctuations between 6.0–7.0, and thrives in the simplest possible system the no-pump Kratky method. Loose-leaf varieties allow continuous harvesting using the cut-and-come-again method.
For complete beginners, regrowing green onion roots from kitchen scraps in a Kratky jar is even simpler but lettuce gives you a more complete and transferable learning experience across the full hydroponic growing cycle.
Can I grow tomatoes indoors hydroponically?
Yes cherry tomato varieties can be grown successfully indoors hydroponically. They require 16–18 hours of high-intensity LED light daily, EC levels between 2.0–3.5 depending on growth stage, physical staking support, and manual pollination indoors. Compact determinate varieties like Tiny Tim are the most practical choice for apartments. Avoid large beefsteak varieties.
It’s best to grow two or three cycles of easier crops first. By the time you switch to tomatoes, you’ll understand your system’s behaviour which makes the tomato grow significantly more likely to succeed.
Which plants grow the fastest in hydroponics?
The fastest hydroponic plants are:
- Green onions regrown from scraps — visible results in 5–7 days
- Arugula — germinates in 3–5 days; harvestable at 21–28 days
- Cilantro — harvestable at 21–28 days from seed
- Mint (from cuttings) — roots visible in 7 days; harvestable at 20–25 days
- Lettuce — harvestable at 28–35 days (loose-leaf varieties)
- Basil — harvestable at 25–35 days from seed
What hydroponic system is best for beginners?
The Kratky method is the best hydroponic system for beginners. It requires no pump, no timer, no electricity beyond a grow light, and minimal monitoring. A container, net pots, clay pebbles, and nutrient solution is all you need.
| System | Complexity | Cost | Best For |
|---|---|---|---|
| Kratky | Very Low | $15–$40 | First-time growers; herbs and lettuce |
| DWC | Low–Moderate | $40–$100 | Faster growth; committed beginners |
| NFT | Moderate | $80–$200 | Multiple plants; intermediate growers |
| Ebb & Flow | Moderate–High | $100–$300 | Fruiting crops; experienced growers |
| Aeroponics | High | $200–$500+ | Advanced; maximum growth rates |
How much does it cost to start a beginner hydroponic garden?
Beginner hydroponic setup costs by type:
| Setup Type | Cost (USD) | What’s Included | Best For |
|---|---|---|---|
| DIY Kratky (basic) | $15–$40 | Container, net pots, clay pebbles, nutrients | Absolute beginners |
| DIY Kratky + LED | $50–$100 | Above + LED grow light | Most apartment growers |
| Countertop smart system | $80–$150 | Everything in one unit | Easy setup; small kitchens |
| Intermediate DWC | $100–$200 | Tank, pump, air stone, LEDs | Growing beyond basics |
| Full setup (multi-plant) | $200–$400 | Complete NFT or DWC system | Serious beginners |
Ongoing nutrient costs are minimal a starter kit typically lasts 6–12 months for a home setup.
What nutrients do hydroponic plants need?
Hydroponic plants need three primary macronutrients (nitrogen, phosphorus, potassium), three secondary nutrients (calcium, magnesium, sulphur), and seven trace elements (iron, manganese, zinc, boron, copper, molybdenum, chlorine). All are delivered dissolved in water. Quality beginner nutrient solutions include all of these in appropriate ratios.
Recommended beginner-friendly nutrient solutions:
- General Hydroponics Flora Series (three-part system; widely available globally)
- MaxiGro / MaxiBloom (simple two-stage powder system)
- Nutrifield or Australian Hydroponics brand solutions (for Australian growers)
- HydroFarm or MasterBlend (widely available in Singapore and Southeast Asia)
What is the best pH level for hydroponic plants?
The best pH level for most hydroponic plants is 5.5–6.5, with 6.0 being the safest starting point that works for almost every crop on this list.
| Crop Type | Ideal pH Range |
|---|---|
| Leafy greens (lettuce, spinach, kale) | 6.0–7.0 |
| Herbs (basil, mint, cilantro) | 5.5–6.5 |
| Fruiting crops (tomatoes, peppers) | 5.5–6.5 |
| Strawberries | 5.5–6.5 |
| Bok choy, Swiss chard | 6.0–7.0 |
pH controls nutrient availability even if nutrients are present in correct amounts, the wrong pH makes many of them chemically unavailable to plant roots. A basic digital pH meter ($15–$25) is one of the most essential tools a beginner can own.
How often do I need to change the nutrient solution?
Change your hydroponic nutrient solution completely every 7–14 days. Between full changes, top up with plain pH-adjusted water to replace what plants have consumed through evaporation and uptake. This prevents nutrient salt buildup, pH drift, and pathogen accumulation in the reservoir.
| System Type | Solution Change Frequency | Top-Up Frequency |
|---|---|---|
| Kratky | When reservoir runs low | As needed |
| DWC | Every 7–10 days | Every 2–3 days |
| NFT | Every 7–14 days | Daily |
| Ebb & Flow | Every 7–14 days | Every 2–3 days |
What is the ideal water temperature for a hydroponic reservoir?
The ideal reservoir temperature for most hydroponic crops is 18–22°C. Above 24°C, water holds less dissolved oxygen (critical for root health) and becomes hospitable to root pathogens like Pythium (root rot). Below 15°C, plant growth slows significantly and basil in particular will suffer.
| Temperature | Effect on Plants |
|---|---|
| Below 15°C | Slowed growth; basil root stress |
| 18–22°C | Optimal for most crops |
| 22–24°C | Acceptable; monitor closely |
| Above 24°C | Root rot risk increases; oxygen levels drop |
| Above 28°C | High risk of Pythium infection; productivity drops |
In Singapore and during Australian summers, consider insulating your reservoir, keeping it shaded, or adding a small aquarium chiller for DWC systems.
Conclusion
Indoor hydroponic gardening is genuinely accessible not just as a concept, but as a practical reality for apartment dwellers in Singapore, Australia, and beyond. The key insight that separates successful beginners from frustrated ones is simple: start with the right plants and let your confidence and skill grow alongside your crops.
If you’re just starting out, the most practical path forward:
- Start with one crop — Lettuce, basil, or green onions. Don’t try to grow five things at once.
- Use a Kratky setup first — No pump, no timer, no complexity. Prove the concept works before adding equipment.
- Get your measurement tools sorted — A pH meter and an EC/TDS meter tell you almost everything you need to know about why your plants are behaving the way they are.
- Learn before you scale — Grow two or three complete cycles before expanding to tomatoes, peppers, or strawberries.
- Dial in your environment — Temperature, light duration, and airflow matter more than most beginners expect.
The 15 plants in this guide represent the best starting points in the world of indoor hydroponics each chosen because they’re genuinely productive without demanding expert-level knowledge or sophisticated equipment. You don’t need a greenhouse. You don’t need an engineering background. You don’t need a large apartment.
You just need to pick one plant, set up a simple system, and start.
Most people are genuinely surprised by how quickly indoor hydroponics goes from experiment to habit and then from habit to something they quietly rely on.